Table Of Contents
How to Transpose in VBA?
Switching rows and columns is a data manipulation technique that almost all users use in Excel. The process of converting horizontal data to vertical and vertical data to horizontal is called “Transpose” in Excel. We are sure you must be familiar with transposing in a regular worksheet. This article will show you how to use the transpose method in VBA coding.
We can transpose in VBA using two methods.
- Transpose Using TRANSPOSE Formula.
- Transpose Using Paste Special Method.
When transposing, we are swapping rows to columns and columns to rows. So, for example, if the data is in a 4 X 3 array, it becomes a 3 X 4 array.
Let us see some examples of transposing columns to rows in VBA.
Table of contents

#1 - VBA Transpose Using TRANSPOSE Formula
Like how we use TRANSPOSE in excel similarly, we can also not have a TRANSPOSE formula in VBA, so we need to use it under the Worksheet function class.
For example, look at the below data image.

We will try to transpose this array of values. Follow the below steps to transpose the data.
Step 1: Start the subprocedure.
Code:
Sub Transpose_Example1()

End Sub

Step 2: First, we must decide where to transpose the data. In this, we have chosen to transpose from cell D1 to H2. So, enter the VBA code as Range (“D1: H2”).Value =
Code:
Sub Transpose_Example1()

Range("D1:H2").Value =

End Sub

Step 3: Now, in the range mentioned above, we need the value of range A1 to B5. To arrive at this, open the “WorksheetFunction” class and select the “Transpose” formula.

Step 4: In Arg 1, supply the data source range, i.e., Range (“A1: D5”).
Code:
Sub Transpose_Example1()

Range("D1:H2").Value = WorksheetFunction.Transpose(Range("A1:D5"))

End Sub

We have completed the TRANSPOSE formula coding. Now, run the code to see the result in the D1 to H2 range of cells.

As we have seen in the above image, it has converted the range of cells from columns to rows.
#2 - VBA Transpose Using Paste Special Method
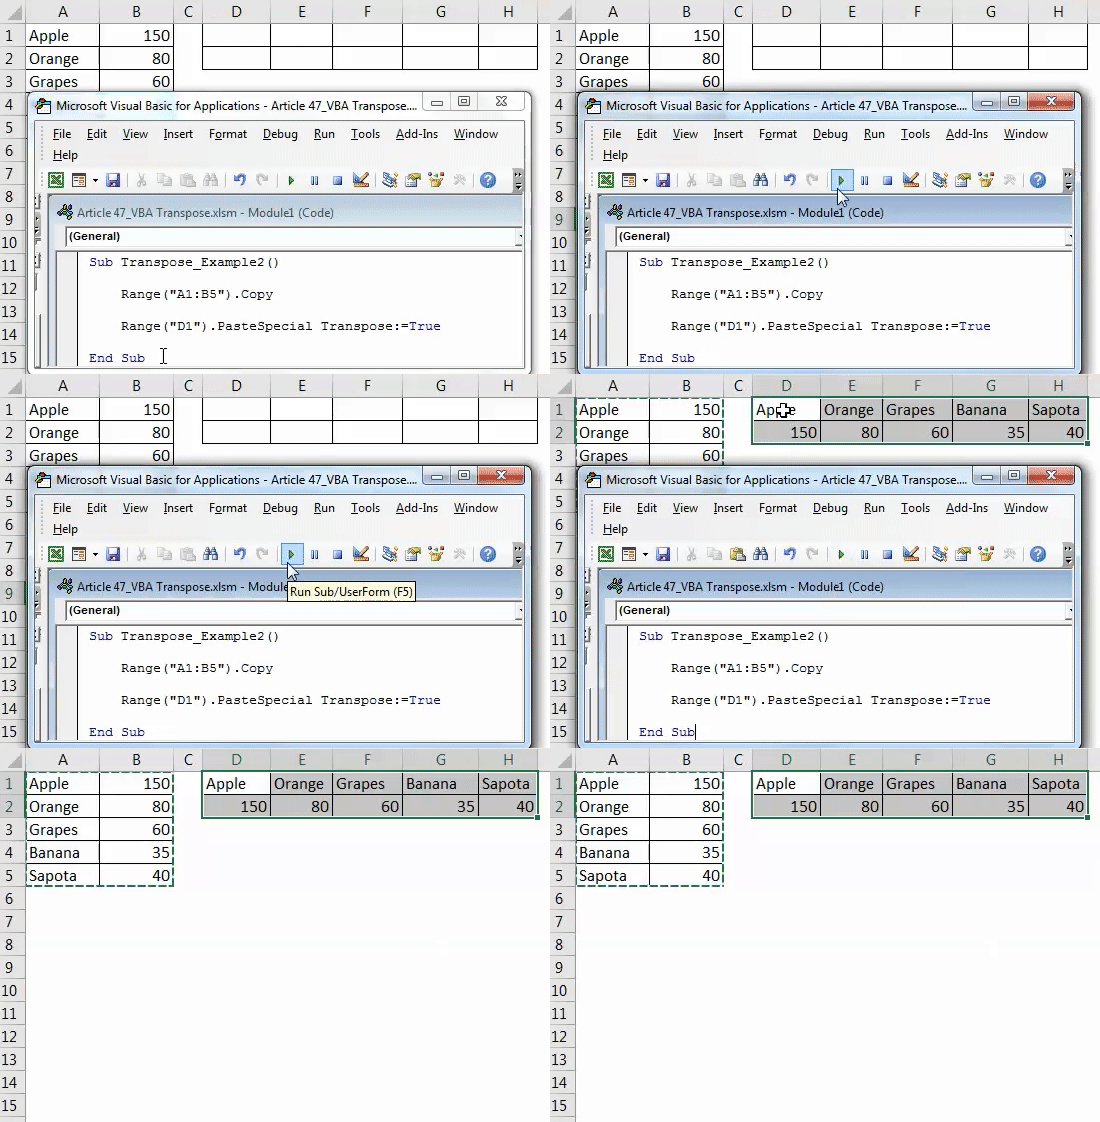
We can also transpose using the Paste Special method. Consider the same data for this example as well.

The first thing we must do to transpose is copy the data. So, write the code as Range(“A1: B5”).Copy
Code:
Sub Transpose_Example2()

Range("A1:B5").Copy

End Sub

The next thing is we need to decide where we are going to paste the data. In this case, we have chosen D1 as the desired destination cell.
Code:
Sub Transpose_Example2()

Range("A1:B5").Copy

Range("D1").

End Sub

Once the desired destination cell is selected, we must select the “Paste Special” method.

With Paste Special, we can perform all our actions with regular Paste Special methods in a worksheet.
Ignore all the parameters, select the last parameter, i.e., Transpose, and make this TRUE.
Code:
Sub Transpose_Example2()

Range("A1:B5").Copy

Range("D1").PasteSpecial Transpose:=True

End Sub

It will also transpose the data like the previous method.

Like this, we can use the TRANSPOSE formula or Paste Special method to transpose the data to switch rows to columns and columns to rows.
Things to Remember
- If we use the TRANSPOSE worksheet function, it is mandatory to calculate the number of rows and columns to transpose the data. For example, if we have 5 rows and 3 columns, it becomes 3 rows and 5 columns while transposing.
- If you want the same formatting while using paste special, you must use the Paste Type argument as “xlPasteFormats.”
You can download this VBA Transpose Excel Template from here - VBA Transpose Excel Template.
Recommended Articles
This article has been a guide to VBA Transpose. Here, we discussed transposing columns to rows using VBA code with examples and a downloadable Excel template. Below are some useful articles related to VBA: -
