Table Of Contents
Excel VBA MsgBox
The VBA MsgBox function is used to display a message to the user in a pop-up dialog box. It serves as an output function, similar to a print statement in other programming languages. This function is commonly used to show general information, alerts, or the results of calculations. It does not require any arguments, but you can customize the message by including text in double quotes or inserting variable values.
To create personalized messages, you can combine fixed text with variable values using the ampersand (&). The message string must be enclosed in double quotes, and variables can be added to the message using concatenation. For example, the below code will display “Hello” in a message box.
Sub ShowMessage()
MsgBox "Hello"
End Sub
When we start learning VBA, the first thing we try to learn is the MsgBox function. It is nothing but a small box that holds the message to the user.
This tutorial will show you how to show a message, customize the message box, icon change, button change, and other modalities of the message box.
Key Takeaways
- The VBA MsgBox function is used to display messages or alerts to the user during macro execution.
- It pauses the code until the user responds, making it useful for confirmations, errors, or notifications.
- The basic syntax is MsgBox(prompt, [buttons], [title]), where prompt is the message text.
- VBA MsgBox can also capture user responses like Yes or No to control the flow of a program.
Enable Developer Tab
Firstly, if you do not see the Developer tab in your excel, follow the steps below to enable it.
Step 1: Go to FILE > OPTIONS.

Step 2: Click on Customize Ribbon under Excel Options.
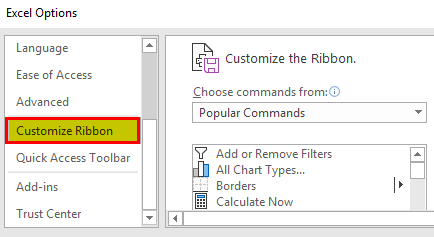
Step 3: On the right-hand side, check the Developer's box to enable it.
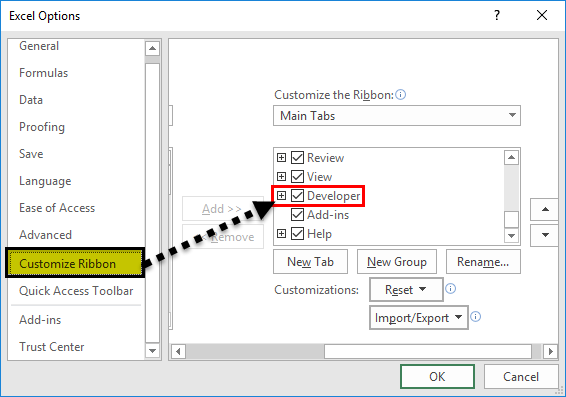
Step 4: Click on "OK" and close this window. Now, you should see the Developer tab in your Excel ribbon.

MsgBox Function Syntax
We can see the syntax in the module when we type the word MsgBox. Now, we will introduce you to the syntax.

- Prompt: This is the first and mandatory argument. In the above example, we must type the word "Welcome to VBA" as the Prompt. It is nothing but the message we need to show. We can show up to 1,024 characters.
- Button: This is nothing but what kind of button we need to show on the MsgBox. For example, In our previous example, the default button was "OK."
- Title: This is the title of the message box. We can customize this title and give our name to the message box in double quotes.
- HelpFile and context – Optional. Used for linking to a custom help file and specifying context ID.
How To Create A MessageBox Using VBA Code?
Follow the below steps to create a simple msg box using the VBA code.
Step 1: Open Visual Basic Editor
Go to the DEVELOPER tab and click on VISUAL BASIC.

Alternative: You can click the shortcut key ALT + F11.

Step 2: Insert Module
Now, click on INSERT and select MODULE.
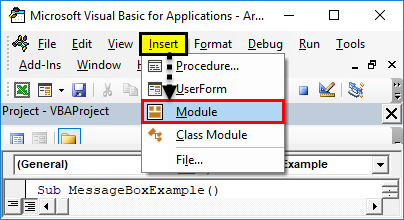
It will insert the new MODULE in your VBA editor.

Step 3: Start Subprocedure
Start your excel macro by typing SUB, the head of the macro. Give a MACRO a name and press the "Enter" key.

Step 4: Start Writing Code for MsgBox
In between the Head & Tail of the macro, we need to write the code. So start the word Msgbox. It will display the VBA MsgBox function.
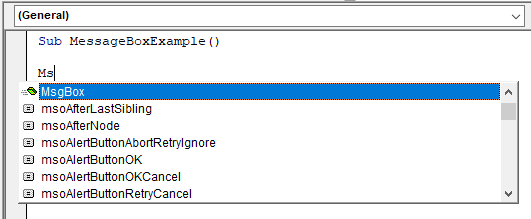
- As soon as you see the word Msgbox press tab, it will start to show the Msgbox syntax.

- Now, type the word Welcome to VBA in double-quotes.
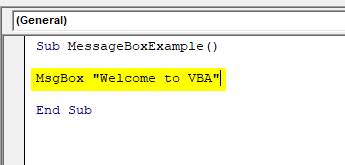
- We have created a simple message box macro.
Step 5: Run the Code
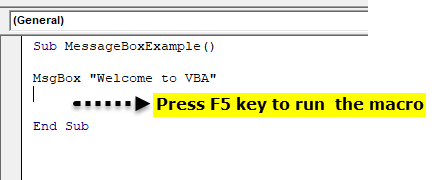
- Now inside the macro, place a cursor and press the key F5, the shortcut key to run a macro.
Step 6: Output
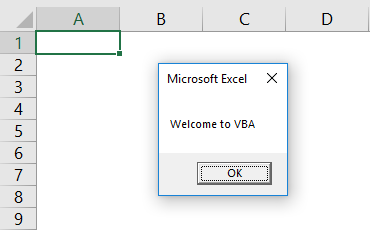
You can see the message box in your Excel window as soon as you run the macro.
Structure Of Message Box
Now, we will introduce you to the structure of the Message Box. It consists of four elements.
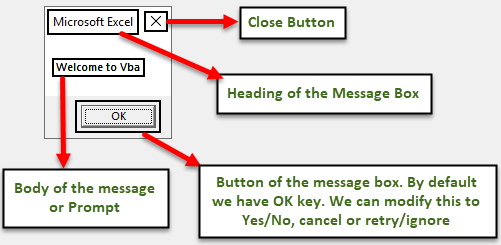
#1 - Title
By default, the message box displays the message box's title as Microsoft Excel. However, we can modify this as well. For example, after we supply Prompt, we can give our name to the VBA MsgBox.
Step 1: First, give a Prompt, i.e., the message you want to show.

Step 2: Now, the next argument is Buttons. Ignore this and jump to the next argument, i.e., Title.

Step 3: We have completed it now. Now, run the macro by using the F5 key.
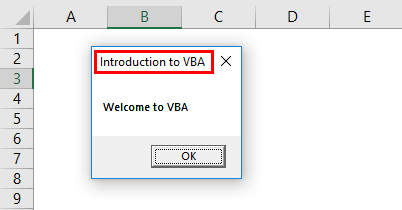
Now, you can see the difference in the title of the message box. Instead of the default title, Microsoft Excel, it now shows Introduction to VBA as the title.
#2 - Buttons
We have learned how to show a message box and alter the message box title. Now, we will see the option of the message box button.
Once we supply the prompt input, the next thing in the syntax is the message box button.

We have as many as 20 kinds of Message Box button options, including Yes/No. You can select any one of the available 20 buttons. For example, we have selected vbYesNoCancel.

Now, run the macro. We will see different message box buttons instead of the default "OK" button.
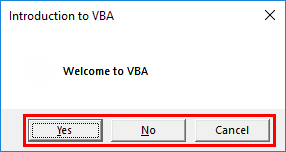
#3 - Combination of Icon & Buttons
We have seen how to modify message box buttons. Along with the message box button, we can also show icons like the image below.
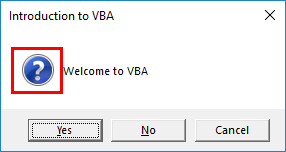
There are four kinds of icons available. vbCritical, vbQuestion, vbExclamation, and vbInformation.
To show the button and the icon, we need to combine both by entering the plus (+) icon together.
#1 - vbQuestion Marks Icon
Code:
Sub SerialNumber ()
MsgBox "Welcome to VBA", vbYesNoCancel + VbQuestion,"Introduction to VBA"
End Sub
Result:

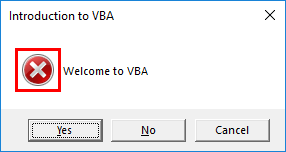
#2 - vbCritical Marks Icon
Code:
Sub MessageBoxExample ()
MsgBox "Welcome to VBA", vbYesNoCancel + VbCritical, "Introduction to VBA"
End Sub
Result:
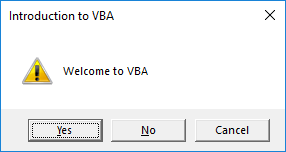
#3 - vbExclamation Marks Icon
Code:
Sub MessageBoxExample ()
MsgBox "Welcome to VBA", vbYesNoCancel + VbExclamation, "Introduction to VBA"
End Sub
Result:
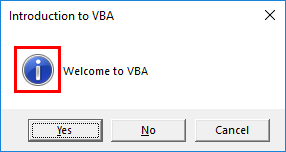
#4 - vbInformation Marks Icon
Code:
Sub MessageBoxExample ()
MsgBox "Welcome to VBA", vbYesNoCancel + VbInformation, "Introduction to VBA"
End Sub
Result:
Important Things To Remember
- We can combine both button and icon by adding a plus (+) icon.
- We can also combine many buttons with a plus (+) icon.
- As we progress to the next levels of VBA, we can study about many advanced message box options.
- We should supply all the numerical prompts with double quotes. However, the numerical values do not require double quotes.
Check out this Basic Excel VBA course for expert knowledge as vouched by many of our regular users.
