Table Of Contents
Excel VBA Debug.Print
Debug.Print is one of the useful tools presented in the VBA editor to figure out how a program works. It helps to analyze the changes in the values of variables created in the VBA program. It shows the output of the prompt window when we run the program without any bugs.

Debug.Print offers the two main benefits over using Msgbox to display the output of the code. It eliminates the need for clicking the "OK" button every time and shows the log of returned output values to the immediate windows. It saves a lot of time for users. The present article explains the use of excel VBA Debug.Print with many examples and explains how to use it, covering the following things.
What is VBA Debug Print?
Debug is an object in VBA used with the two methods called "Assert" and "Print." The "Print" is helpful for in-display messages, and "Asserts" is useful in evaluating the conditions. In VBA, debug. In addition, one can use the print statement in any place of the coding program to show the values of a variable or messages in the immediate window. These do not need any acknowledgment or confirmation and do not display any effect on the code developed. It is safe and best to use the code to facilitate access to many users. These are just helpful in testing or evaluating the code to confirm that it is working correctly or not. It prints the variables, strings, numbers, arrays, and values in Excel and empty and active sheets.
How to Use Excel VBA Debug.Print?
VBA Debug.Print is the statement helpful in displaying more variables at a time in the immediate window. It is the best and alternative approach to show the output.
For example,
Debug.print count, sum, average, standard deviation
As shown in the example, all the variables are separated by commas. This statement can transfer the output to the immediate window even if a window is not opened. It does not stop running the code as in msgbox. This flexibility supports continuous monitoring of the changes in the output concerning changes in the code.
The variables count, sum, average, and standard deviation are displayed in the same line with equal space. If the immediate window is not opened, follow the following steps to see the output.
Steps to Open Immediate Window and See the Output
- Press Ctrl + G or click on the 'View' menu in the VBA Editor.
- Choose the option 'Immediate Window.'
- Place the cursor in the Window and again run the code.
- Observe the output in the window.
Examples of Excel VBA Debug.Print
The following examples demonstrate the use of Debug.Print in Excel VBA.
Example #1 - Displaying the Values of the Variables
First, go to the Developer tab, click on "Macros," and create a macro to write the code in the VBA and add a name to it.

After adding a name, click on "Create." It opens the VBA Editor.

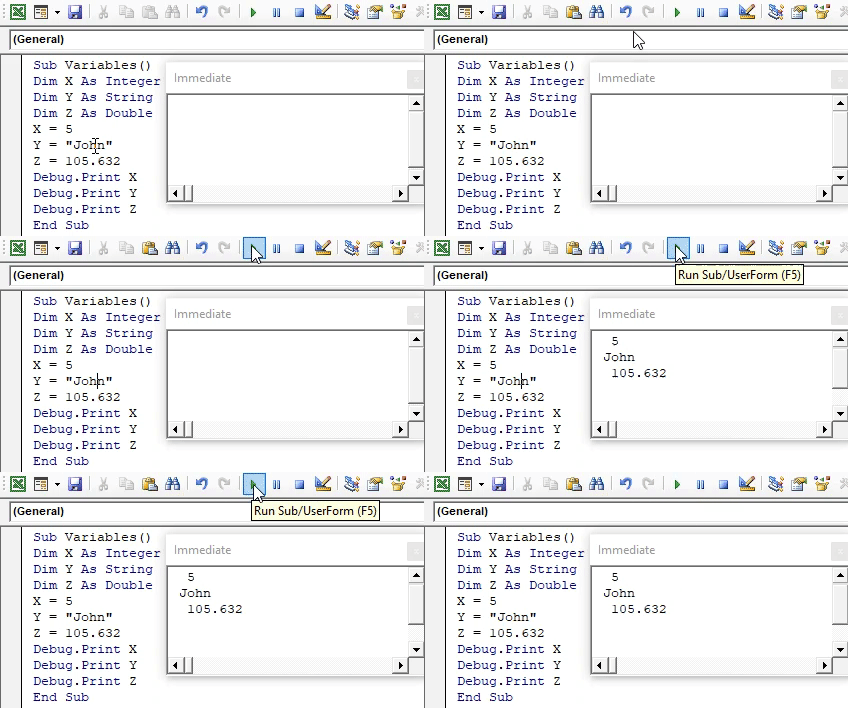
Develop a small program, as shown in the figure.
Code:
Sub Variables()

Dim X As Integer
Dim Y As String
Dim Z As Double
X = 5
Y = "John"
Z = 105.632
Debug.Print X
Debug.Print Y
Debug.Print Z

End Sub

The screenshot shows three dimensions or variables decreasing X, Y, and Z as an integer, string, and double. One can use the Debug.Print these values. It will display the output in the prompt window. Press CTRL+G to see the result, as shown in the screenshot.
Run this code using the F5 key and press CTRL+G to see the output in the immediate window.

One can simplify this program by separating the Debug.Print statements by a comma.
Code:
Sub Variables()

Dim X As Integer
Dim Y As String
Dim Z As Double
X = 5
Y = "John"
Z = 105.632
Debug.Print X, Y, Z

End Sub

The debug statement prints the output in the same line, as shown in the screenshot.

Example #2 - Debug print to File
This example illustrates the use of the VBA Debug.Print to display output to a file when the length of the text is too high.
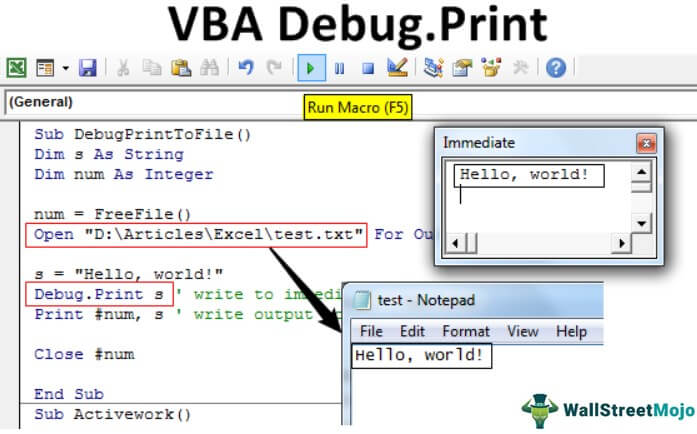
The program is developed to print the output on a file, as shown in the figure.
Code:
Sub DebugPrintToFile()

Dim s As String
Dim num As Integer

num = FreeFile()
Open "D:ArticlesExceltest.txt" For Output As #num

s = "Hello, world!"
Debug.Print s ' write to the immediate window
Print #num, s ' write output to file

Close #num

End Sub

In this program, two variables, S and Num, are considered string and integer. The open statement creates a text file with the name test. A column called "Hello World" is declared into the variable S.
When you run the VBA code manually or using the F5 key, one can write the output into the immediate window, and the file displays in the folder at a time.

The output of the file shows in the below-mentioned figure.

Printing output to file is beneficial when presenting long text.
Example #3 - Displaying the Factorial of a Number in the Immediate Window
This example illustrates the use of the debug—a print statement to show the factorial of a number.
Code:
Public Sub Fact()

Dim Count As Integer
Dim number As Integer
Dim Fact As Integer
number = 5
Fact = 1
For Count = 1 To number
Fact = Fact * Count
Next Count
Debug.Print Fact

End Sub

One must consider three variables for determining the factorial, including the count, number, and fact. For loop is taken to repeat the multiplication of fact-value with count to determine factorial of the number.
Here, debug. The print statement uses outside the "for" loop to display the value after completing the circle. The output is determined.

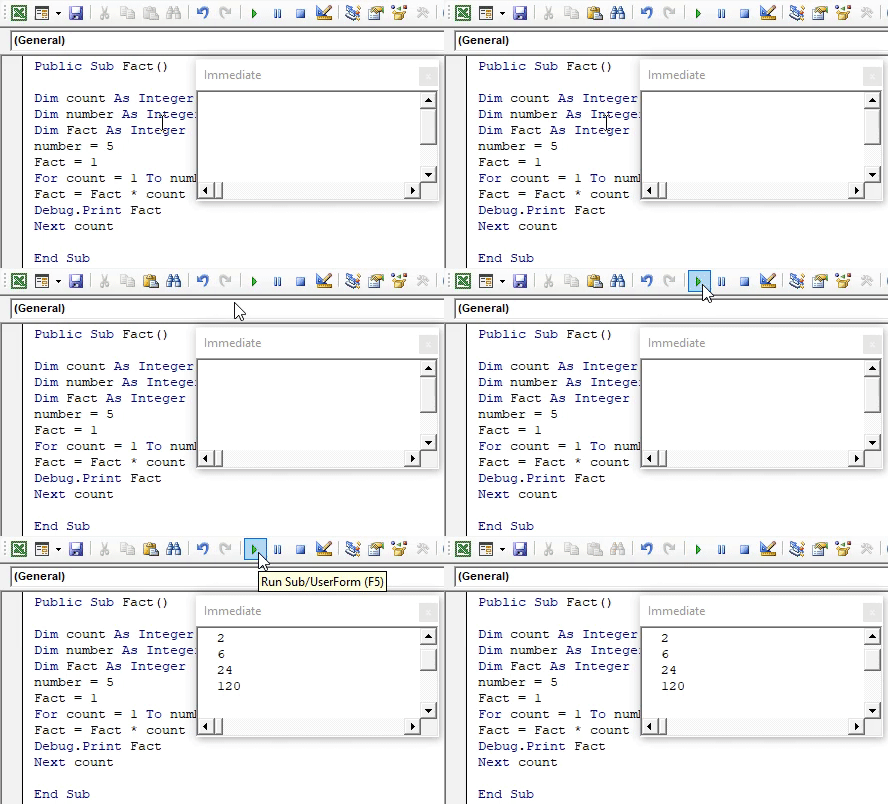
If we use the Debug.Print statement inside the "for" loop; the fact-value is displayed for every recurring time, as shown in the figure.
Code:
Public Sub Fact()

Dim Count As Integer
Dim number As Integer
Dim Fact As Integer
number = 5
Fact = 1
For Count = 1 To number
Fact = Fact * Count
Debug.Print Fact
Next Count

End Sub

Run the code by pressing the F5 key and see the output in the immediate window. In this situation, we should consider the last value as the factorial of the given number.

Example #4 - Printing the Full name of the Active Workbook
This example explains how to print the current workbook name into the prompt window.
Then, the program develops, as shown in the figure.
Code:
Sub Activework()

Dim count As Long
For count = 1 To Workbooks.count
    Debug.Print Workbooks(count).FullName
Next count
Debug.Print count

End Sub

Here ‘count’ is the variable taken to count the number of active workbooks and to display the full name of the active workbook. The full name and number of active workbooks are displayed, as shown in the figure.

The workbook's path in the drives displays accurately using the VBA Debug.Print statement.
Things to Remember
- The main issue with the debug .print is no text wrapping option for long strings in the immediate window.
- We should bring the immediate window to the top to see the output in the user interface.
- It is impossible to wrap the long text displayed in the immediate window. In this situation, we must show the result to a file stored in the drive.


