Table Of Contents
What Is Spell Check In Excel?
Spell Check in Excel is a method to detect spelling errors in the text strings in an Excel workbook. Unlike MS Word and PowerPoint, Excel does not underline a misspelled word which results in spelling mistakes.
Excel Spell Check is beneficial when working with databases containing a mix of numbers and text.
For example, the cell references and text strings of a worksheet are listed as follows:
- Cell A1 consists of “Garden”.
- Cell A2 consists of “Kitchne”.
- Cell A3 consists of “Bulding”.
- Cell A4 consists of “Garage”.
On running a Spell Check, the “spelling” window opens. It shows the suggestions or the right spellings of the misspelled words such as “kitchen” and “building”. Clicking “change” replaces the misspelled words (in cells A2 and A3) with the suggested options.
As shown in the image below, the shortcut (F7) or pressing the “spelling” button (under the Review tab) opens the “spelling” window.

Key Takeaways
- The Spell Check in Excel helps users deliver an error-free Excel workbook, and ensures that the text is in accordance with the current proofing language.
- We can use the shortcut key F7 or the Review Tab to perform spell check for the Excel workbook.
- In Excel Spell Check, we have multiple options, such as,
- Ignore, Ignore All - To leave the misspelled words as it is.
- Change, Change All - To replace the misspelled words with the required text.
- AutoCorrect – To set some words to get automatically adjusted to the right spellings, and
- Add to dictionary – To add new words such as frequently used abbreviations, acronyms, names of people, etc.
How Spell Check In Excel Works?
Let us understand the working of the Excel Spell Check by assuming that the range A1:A10 consists of text strings. The user can select any of the following options as the starting point:
- Select cell A1 – Excel checks the entire worksheet for spelling errors.
- Select cell A5 (or any other cell) – Excel checks for spelling errors beginning from cell A5 till the last data cell. Once it completes the Spell Check, a message asks whether to continue checking at the beginning of the sheet or not. The user is presented with the following options:
a. Yes – If this is clicked, Excel resumes checking from cell A1 and stops at cell A5.
b. No – If this is clicked, Excel stops checking at that point (last data cell of the worksheet).
How To Perform Spell Check In Excel?
In Excel, Spell Check in Excel is carried out either by,
- Pressing the shortcut F7.
- Enabling AutoCorrect.
- Pressing the “spelling” option from the Review tab.
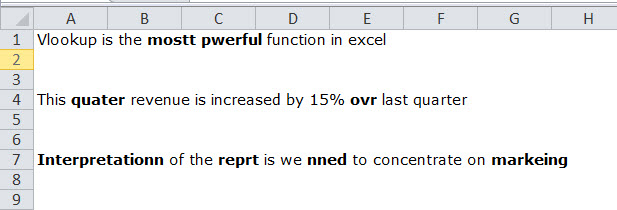
For example, the following image shows the data of a worksheet. The spelling errors have been highlighted in bold. We will run a Spell Check in Excel using the shortcut key F7.
Let us assume that the cell A1 is the starting point.
The steps to apply Spell Check are as follows:
Step 1: Select cell A1 and press F7.
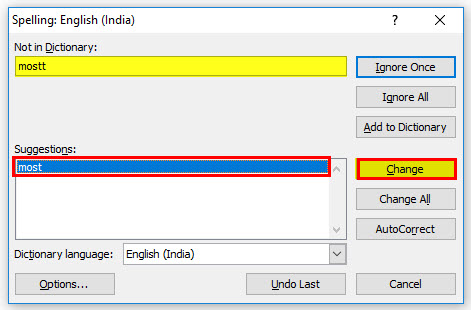
- The “spelling” dialog box opens, as shown in the succeeding image. The spelling “mostt” is “not in dictionary”. The suggested spelling is “most”.
- To accept the suggestion, click “change”. To ignore the suggestion, click “ignore once”.
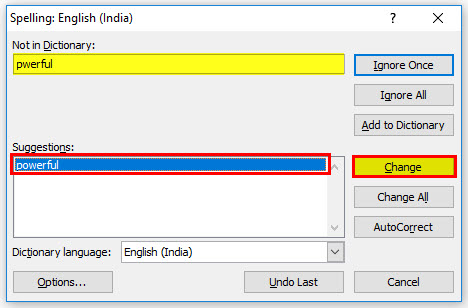
Step 2: Once an option is selected, the next spelling mistake gets displayed. The spelling “pwerful” is incorrect and “not in dictionary”. The suggested spelling is “powerful”.
Click “change” to replace the incorrect spelling with the correct one. Otherwise, click “ignore once” to retain the incorrect spelling as is.
Likewise, the Spell Check continues till the last data cell of the worksheet.
The Spell Check Window In Excel
The “spelling” dialog box is shown in the following image. Let us understand the functions of the options present on the left side of this window.
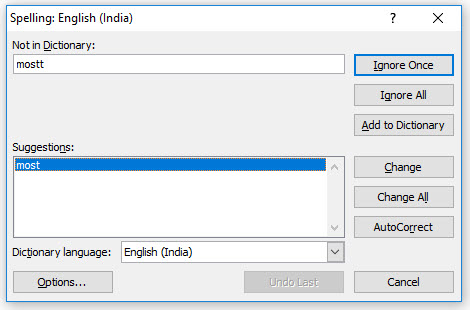
Not in dictionary: It shows the misspelled word, which is not there in the Excel dictionary. Excel recognizes this word as a spelling mistake.

Suggestions: It displays one or more words that are similar in spelling to the misspelled word. These words are the corrections suggested by Excel.

Dictionary language: It is the selected language, which is adhered to while checking for misspelled words.

Let us understand the functions of the various options on the right side of the “spelling” window. These options are shown with serial numbers in the following image.
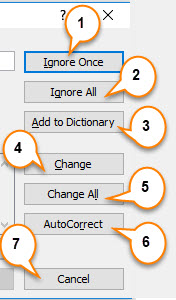
The options are explained as follows:
- Ignore once: Clicking this option ignores the current error. So, the misspelled word remains as is.
- Ignore all: With this option, all the instances of the misspelled word are ignored. So, all occurrences of the misspelled word remain as is.
- Add to the dictionary: It adds the current word to the dictionary. Henceforth, Excel will not identify this word as an error. This option should be used if the spelling is correct, but is not present in the dictionary. For instance, an abbreviation or a person’s name can be added to the dictionary.
- Change: Clicking this option replaces the misspelled word with the suggested word. One can choose from the suggestions listed in the “spelling” window.
- Change all: This replaces all the instances of the misspelled word with the suggested word. Before clicking this option, one can select from the available suggestions.
- AutoCorrect: Clicking this option adds the misspelled word and the selected suggestion to the AutoCorrect list. Henceforth, if the same incorrect spelling is typed, Excel will auto-correct it. For example, the misspelled word is “nned” and the suggested word is “need”. With AutoCorrect, every time “nned” is typed, it will automatically be converted to “need”. We will have noticed some words such as “AND” & “THE” autocorrected when mistyped.
- Cancel: Clicking this option stops the Spell Check process and closes the “spelling” window. It can be clicked at any point.
The AutoCorrect In Excel
One can enable, disable, or customize the AutoCorrect feature in Excel.
The steps to customize the AutoCorrect feature are listed as follows:
- Click the File tab on the Excel ribbon.

- Click “options.”

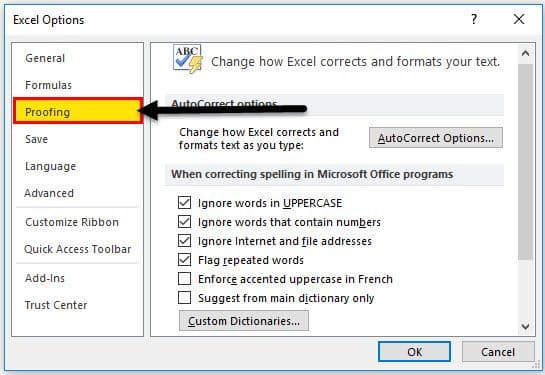
- The “Excel options” window opens. Click “proofing.”

- Click “AutoCorrect options.”

- The “AutoCorrect” window appears, as shown in the succeeding image.
In the box under “replace,” type the words which need to be replaced. Type the replacements (corrections) in the box under “with.”
In other words, Excel is being told to replace the incorrect spellings (in the “replace” box) with the correct ones (in the “with” box).
Hence, the AutoCorrect feature can be customized as per the requirements of the user.

The Features Of The Spell Check In Excel
The features of the Excel Spell Check are listed as follows:
- It ignores the uppercase values. For example, if the word is “KITCHNE”, Excel does not recognize this as an error.
- Unlike MS Word, it does not correct grammatical errors.
- The default settings of the Spell Check can be changed by selecting “proofing” from “options” under the File tab.
- It does not recognize a text string containing a number (in one cell) as an error. For example, if the word is “KITCHNE1”, it is not identified as an error.
- It identifies repeated words as errors. For example, in the string “this is the the kitchen,” the extra “the” is pointed as an error.
Important Things To Note
- If there are no spelling errors in the worksheet, the “spelling” window will not open. To change the dictionary language in such cases, misspell a word intentionally. In this way, the “spelling” window is made to appear.
- The “AutoCorrect” window already lists the typical misspellings and their corrections that are used by default. We can change, add, or delete entries from this list.
