Table Of Contents
What Is Reduce File Size In Excel?
Reduce Excel File Size is a feature that helps us store files in a compressed way and avoid using huge memory space. Rather than saving the spreadsheet in the default file format (.xlsx), we must store it as a Binary Excel Workbook (.xlsb).
We can Reduce File Size in Excel using image compressing, converting irrelevant formulas to values, and clearing the Pivot Cache.
For example, we can reduce a file size using the “Save File in Binary Format”, as shown below.
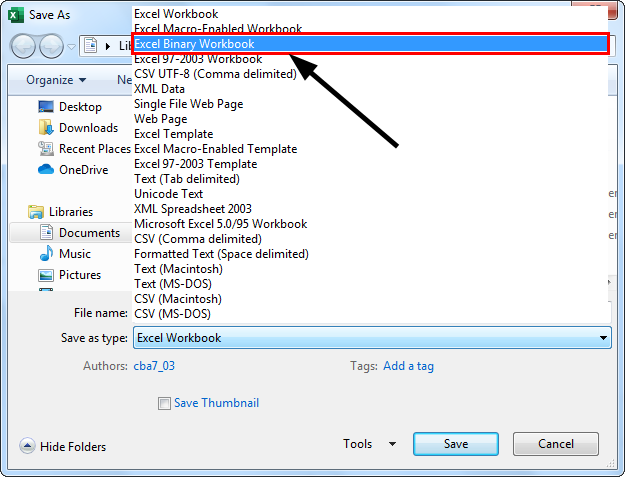
Table of contents
- Reduce Excel File Size helps us use less memory to save files that take more memory space. We can compress the size of the files in various ways and for faster use.
- There are other approaches, such as using the compressed zipped folder. It is done by right-clicking the Excel file, going to “Send”, and then clicking on a compressed zipped folder. It will Reduce the File Size while sharing. We can also use this method for multiple files.
- We can Reduce File Size in Excel using image compressing, converting irrelevant formulas to values, and clearing the Pivot Cache.
Top 4 Methods To Reduce the File Size Of Excel
The four methods to Reduce the File Size in the Excel workbook are as follows:
- Save File in Binary Format.
- Convert Unnecessary Formulas to Values.
- Compress Image.
- Deleting Pivot Cache.
Let us discuss each of the methods in detail.
#1 - Save File in Binary Format
We can Reduce the Excel File Size by converting the regular .xlsx format to .xlsb, the binary format. Thereby reducing the file size to the least possible.
The steps to save the files in Binary Format are as follows:
- Open the Excel file to be reduced in size also that is saved in the .xlsx format.
- Then click on the “File” tab. In the File Tab drop-down list in Excel, choose the “Save As” option.

- Now select the “Browse” Option, then a dialog box pops up.

- Then, insert the file name in “File Name.” Now, in the “Save as type:” dropdown, select the “.xlsb” format, and click “Save.”

This approach will enable them to Excel files to reduce the size of the spreadsheet.
#2 - Convert Unnecessary Formulas to Values
To Reduce the Excel File Size, we will convert unnecessary formulas into values.
The steps to understand the conversion method are,
- Step 1 - Open the Excel file, and select the entire worksheet or the number of columns to be converted from formulas to values.
- Step 2 - Now, press the “F5” key, and the pop-up dialog box appears. Then, click “Special”.

- Step 3 - This will open up another dialog box as shown below, then click the “Radio” button for “Formulas”, and click “OK”.
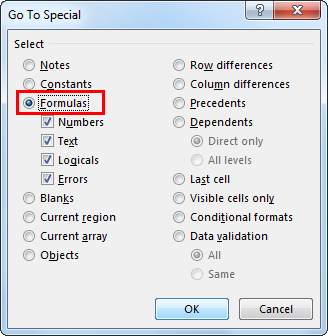
- Step 4 - Now, all the cells containing formulas have been selected. Next, go to the “Home” tab, and click “Paste”.
- Step 5 - Now, select “Values” once the dropdown appears when clicked on “Paste”. Then click on “Paste Values”.
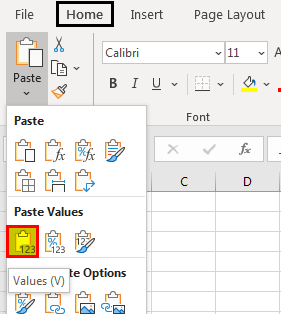
- Step 6 – Alternatively, we can use a shortcut key CTRL+ALT+V, then a dialog box will appear, as shown below. Select the radio button for “Values”, and click “OK”.
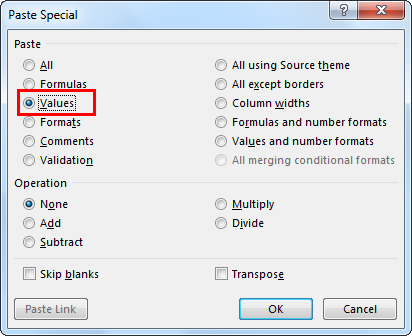
It will convert the selected formulas into values, enabling us to reduce the file and make the spreadsheet lighter.
#3 - Compress Image
The next approach is to compress the image into an Excel file to reduce the workbook size. This method is essential when we have too many pictures in the workbook or worksheet, which increases the size of the Excel file.
The steps to Compress Image are as follows:
- Step 1 - Click on the image that we want to compress. Then, go to the “Picture Format” tab in the ribbon area, as shown below.

It is the picture tool that appears when the image is selected.
- Step 2 - In the “Picture Format” tab, select “Compress Pictures”.

- Step 3 - A dialog box will appear after selecting the compress picture icon.
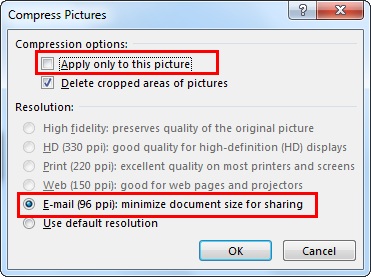
- Step 4 - The option “Apply only to this picture” allows the user to compress only the image which has been chosen. Deselecting this option will allow all the pictures in the workbook to get compressed. Also, select the option “Email (96 PPI): minimum document size for sharing.”
- Step 5 - Click “OK”, and save the workbook. It will reduce the size of the overall Excel file.
#4 - Deleting Pivot Cache
The following approach will help Reduce the Excel File Size by deleting the Pivot Cache while creating the PivotTable from the source data.
- Step 1 - Select the “PivotTable Analyze” tab in the pivot table tools. This tab appears only when the pivot table in the Excel file is selected.

- Step 2 - Now, click the Pivot “Options” drop-down followed by options.

- Step 3 - Next, a dialog box appears. Go to the “Data” tab.
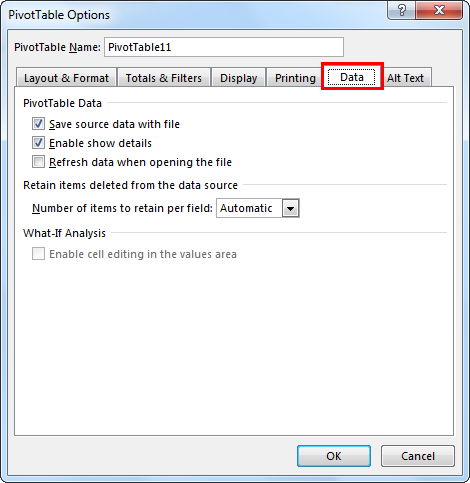
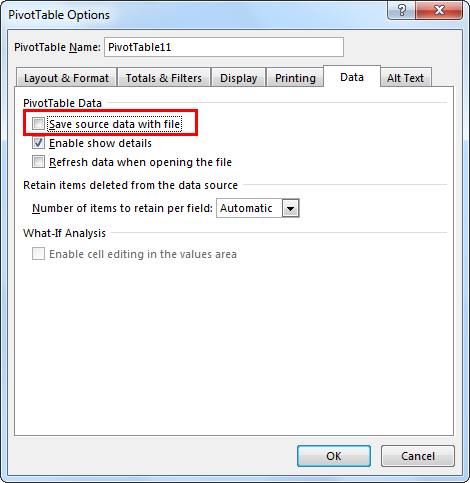
- Step 4 - Select the checkbox for “Save source data with file”. This option will not create any Pivot Cache, and can Reduce the Excel File Size.
- Step 5 - Now, select the option “Refresh data when opening the file”. This will ensure that the pivot is refreshed as soon as the Excel file is opened. If the option is not selected, the PivotTable must be refreshed manually, leading to a Pivot Cache.
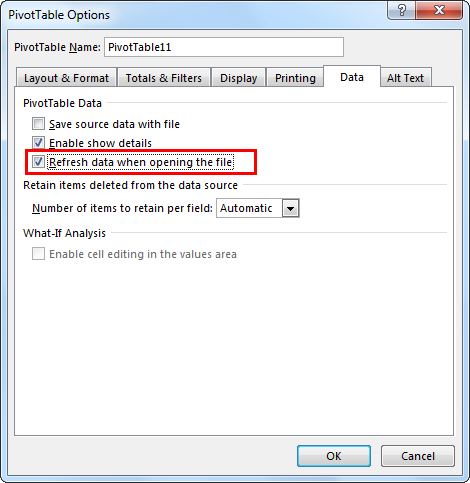
Step 6 - Then, click OK. It will ensure that the Excel file size is reduced.
Important Things To Note
- The XLSB file format tends to open and save much faster. However, there are a few things to consider where we should not convert macro-enabled and query-based Excel files to XLSB, since they might cause functional errors while operating as XLSB.
- Prefer PivotTables over formulas used to summarize data for generally larger data sets. It will have less impact on the file size. Also, if there is higher usage of formulas, then change the “Automatic” calculation mode to “Manual” mode in the “Formulas” tab. Consequently, it will open the file, make changes, update the Excel file, and close it much faster.
Frequently Asked Questions (FAQs)
The Reduce Excel File Size using the Compress Image method helps us to reduce the space taken by the inserted images or pictures so that it decreases the files’ memory space.
The four methods to Reduce the File Size in Excel workbook are as follows:
1. Save File in Binary Format.
2. Convert Unnecessary Formulas to Values.
3. Compress Image.
4. Deleting Pivot Cache.
Another alternative approach to reduce file size is using the compressed zipped folder.
• It is done by right-clicking the Excel file, going to “Send”, and then clicking on a compressed zipped folder.
• It will Reduce the File Size while sharing.
• We can also use this method for multiple files.
Recommended Articles
This article is a guide to Reduce Excel File Size. Here, we learn 4 methods, Save in Binary Format, Compress Image, Remove Pivot Cache, downloadable Template. You can learn more about Excel from the following articles: -
