Table Of Contents
How To Record A Macro In Excel?
Recording macros in Excel helps automate repetitive tasks by capturing the users actions and converting them into VBA code. This feature is useful for users with very little programming experience. In a few clicks, one can create a macro that performs tasks as it is done manually.
To record a macro in Excel, either the View tab or the Developer tab can be used, as shown in the following images.
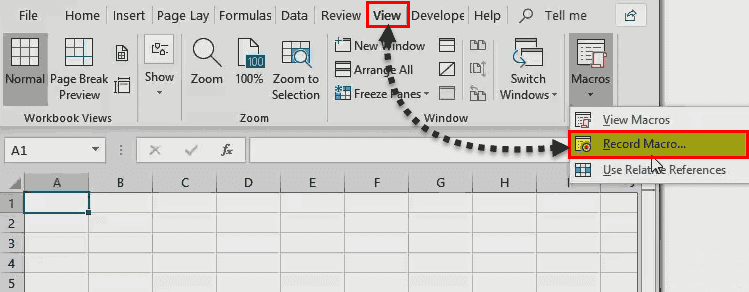

Let us consider an example to understand the steps to create an Excel macro.
The following table contains the overall grades of students. The report is to be formatted on a daily basis. We need to perform tasks like applying borders, highlighting headers, setting background colors, and so on.
We want to record a macro for these repetitive tasks.

The steps to be performed for recording macros are listed as follows:
Step 1: In the Developer tab, select “Record Macro” under the “Code” section.

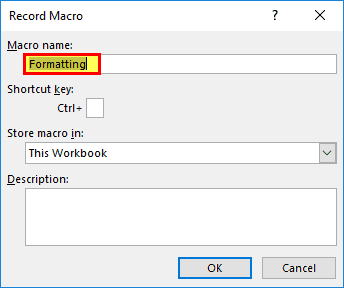
Step 2: The “Record Macro” dialog box opens, as shown in the following image. In “Macro name,” enter “Formatting.”
Note: It should be ensured that no space is entered while naming the macro.

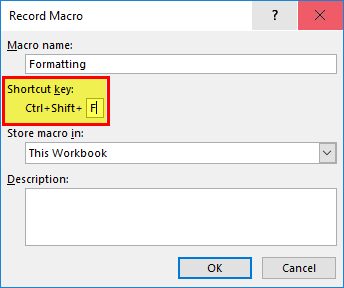
Step 3: In “shortcut key,” assign the shortcut key “F” to the macro. This shortcut runs the macro.
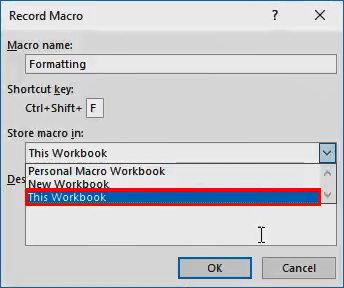
Step 4: In “Store macro in,” select “This Workbook.” With this selection, the macro is stored in the present workbook. Moreover, this macro will work only in the current workbook.
Step 5: In “Description,” type what the macro intends to do.
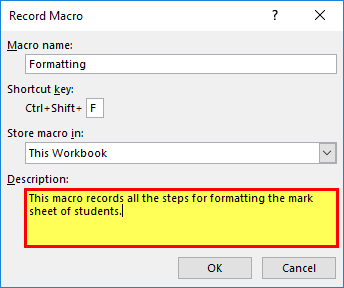
Step 5: Click “OK” and the “record macro” option changes to “Stop Eecording” under the “Code” group.

At this time, the actions we perform are recorded in the macro. To ensure that the automated tasks are executed every time a new range is selected, activate “use relative references.” This is done prior to creating the macro.

Once the steps of formatting like applying borders, highlighting headers, setting background colors, etc., have been recorded, click “stop recording” (shown in the sixth point).
Apply recorded formatting with the help of the shortcut key “Ctrl+Shift+F.” The output is shown in the following image.

Key Takeaways
- Macros help automate repetitive tasks in Excel by recording your actions.
- You can record a macro through the Developer tab without needing to write code.
- Always save the workbook as a macro-enabled file with the .xlsm extension to retain the macro.
Using Recorded Macros
There is another table containing the grades of students. It has to be formatted in the same way the data of Example #1 was formatted.

Select A1 and press “Ctrl+Shift+F” for formatting the selected cells. Hence, custom formatting is applied in one go without carrying out multiple commands.

The limitation of the macro recorder is that it is full of unnecessary codes.
How To Run A Recorded Macro?
To run a recorded macro in Excel, there are a few ways
1. Go to the Developer tab and click on Macros.
In the dialog box that appears, select the macro name you want to run, then click Run.
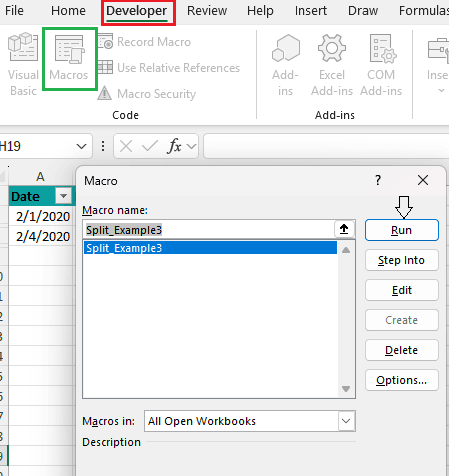
2. You can also assign the macro to a button or shortcut key as shown above for easier access.
How To Save Macros In Excel?
When one has recorded a macro or written one manually, we have to save the workbook as macro enabled with a .xlms extension.
Follow the below steps:
- After recording the macro, click File -> Save As.
- In the "Save as type" dropdown, select Excel Macro-Enabled Workbook (*.xlsm).

3. Choose the desired location and click on Save.
The Cautions While Recording A Macro
The following points must be remembered while recording a macro:
- The file containing macros must be saved with the “.xlsm” extension.
- While downloading an Excel file with the “.xlsm” extension (macro-enabled workbook), it should be ensured that the source is authentic.
- The “auto sum” function should not be used while creating a macro because it hard codes the formula.
- The formula should be typed with a single dollar sign like “=SUM(E$2: E10).” The macro recorder records E$2 as a fixed reference and begins the SUM directly below the “row 1” headings. It recognizes E10 as a relative reference and points directly above the current active cell E11.
