Table Of Contents
What Is Print Labels From Excel?
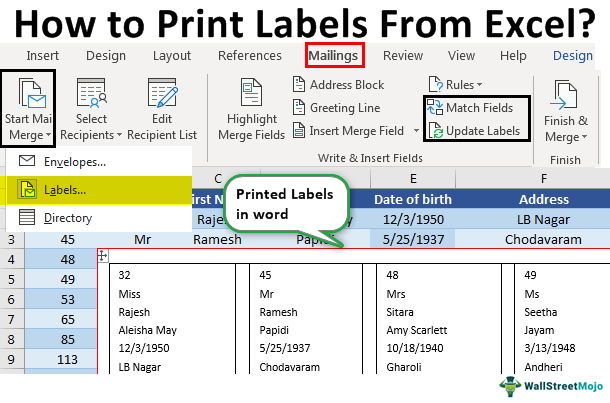
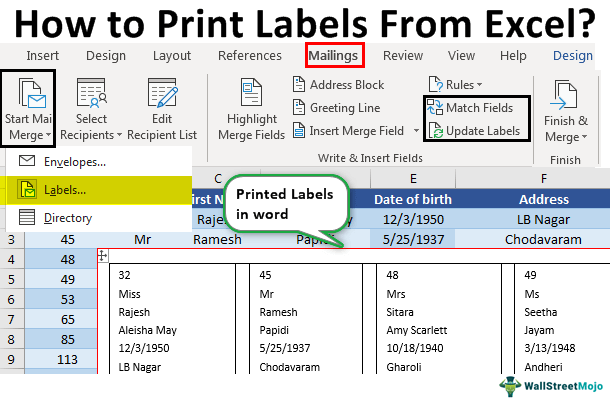
The print label option in Excel is used for various purposes. First, it saves a lot of time for the users in the arrangement of data and convenience in printing data presented under a single label or multiple labels. The following steps are to be followed to create labels and print them, as shown in the figure.

As described in the figure, we should follow the steps to create and use the labels effectively. These steps are the same for all versions of Excel from 2007 to 2016. In addition, each step described must follow the sub-steps to print the labels.
Key Takeaways
- Print labels from the Excel option save users time and provide convenience in printing data presented under single or multiple labels, making data arrangement and presentation more efficient.
- One must save reports and invoice labels created using Word label templates, as they support future use and save time in creating and printing labels.
- To avoid incorrect results when merging Excel sheets into Word documents, one must ensure that they don't display empty cells, rows, or columns and create separate columns for first, last, and title headers.
How To Print Labels From Excel Spreadsheet?
In Excel, we can print labels in two ways. The following examples illustrate the use and print labels from the Excel sheet.
Examples
Example #1 - Print Address Labels From Excel With The Help Of Word
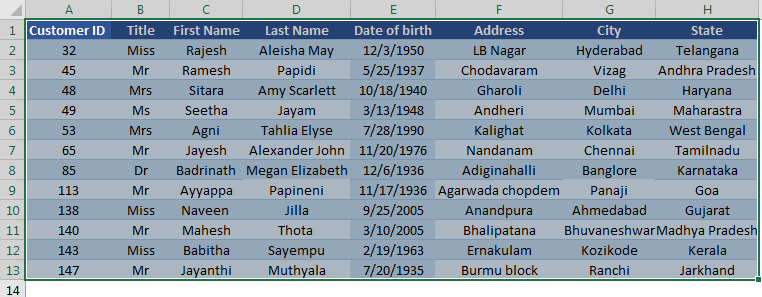
- Step 1: In the first step, the data is arranged into rows and columns, creating the headers, as shown in the figure.

The figure shows that header columns are created as "Customer ID," "Title," "First Name," "Last Name," "Date of Birth," "Address," "City," and "State."
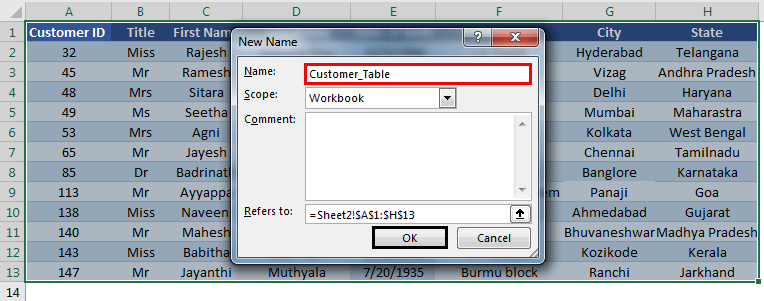
Give a name to the data presented in the Excel sheet in the following way:
First, select the list of addresses in the Excel sheet, including the header.
Go to the “Formulas” tab and select “Define Name” under the group “Defined Names.”

A dialog box called a new name is opened. Give a name and click on “OK” to close the box.
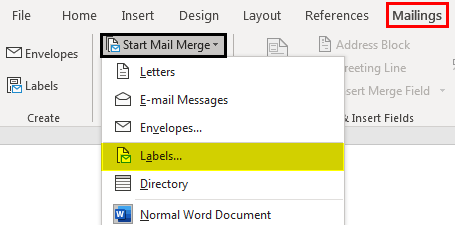
- Step 2: Create the mail merge document in the Microsoft word. Place the cursor over the "Mailings" tab and select the "Start mail merge" option. Then, choose the "Labels" option as shown in the figure.
Then, the "Label Options" dialog box is displayed, as shown in the figure.
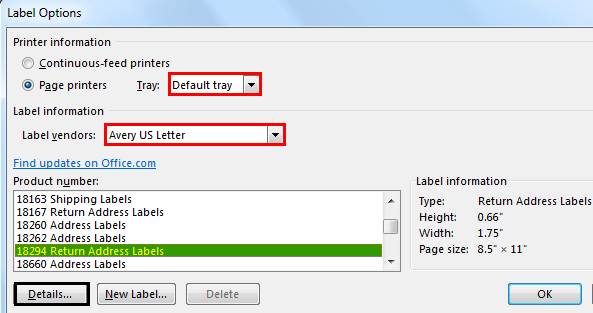
Click on the "Details" tab to preview the label properties.
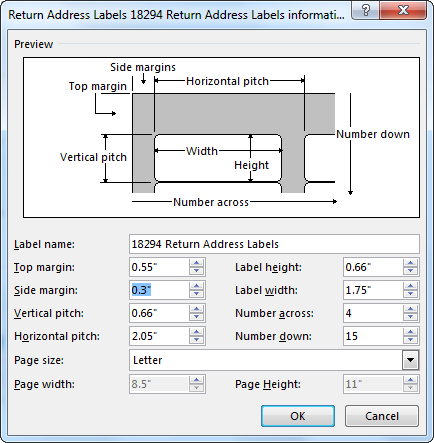
Here, we can change the margin, height, width, pitch, and size of the label and the width, height, and size of the page. Click on "OK" after making the required changes. Then, the page is displayed, as shown in the figure.

Click on the "Design" tab to add table styles to the labels. The appearance is changed, as shown below.

Step 3: Link the labels from the existing list from Excel to the mailing list.
- Go to the "Mailings" tab and choose the “Use an Existing List” option from the select participant’s category.
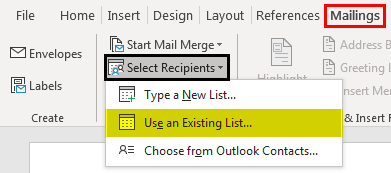
It displays the "Select Data Source" dialog box in the screenshot below.
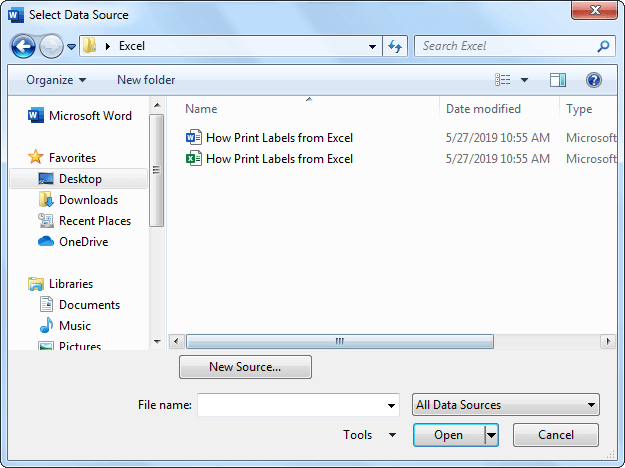
First, choose the Excel sheet in which the table created is presented and click on “Open.”
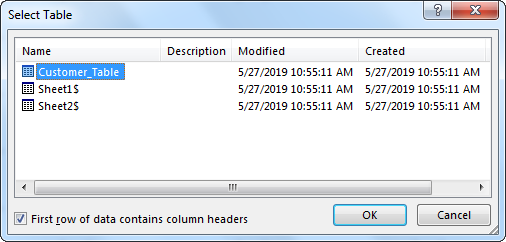
Next, choose the table name and click on the “OK” button.

Then, the page is displayed, as shown in the figure.
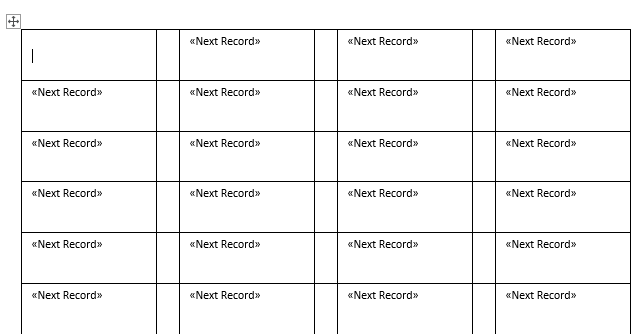
- Step 4: Arrange the labels in the table.
Place the cursor in the first record of the table and insert the labels. To do this, click on the “Insert Merge Field” button.
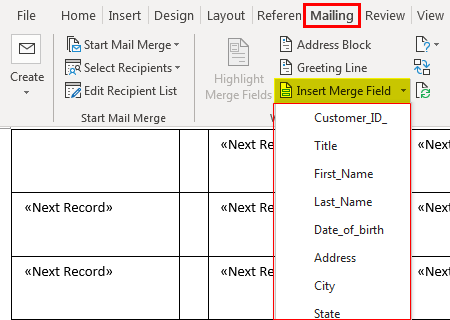
Click on each label one by one. While inserting the labels focus on the arrangement of labels and press the “Enter” key to add a label to the next line.
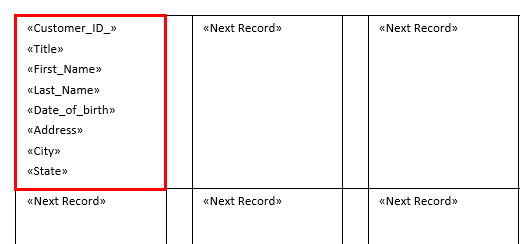
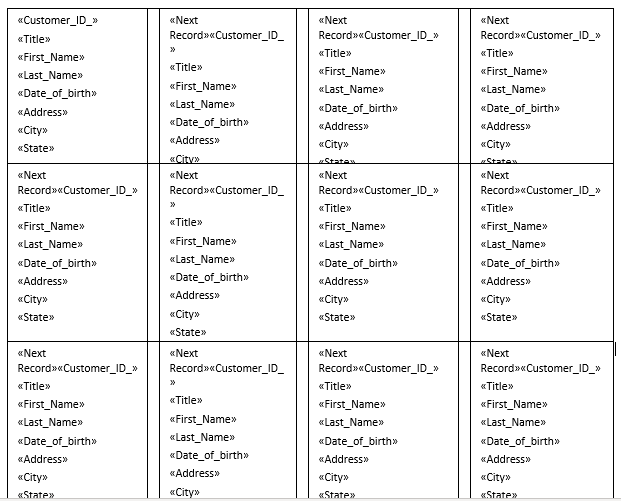
Next, click the “update labels” option to apply the same format to the remaining table records. Then, the page is displayed.
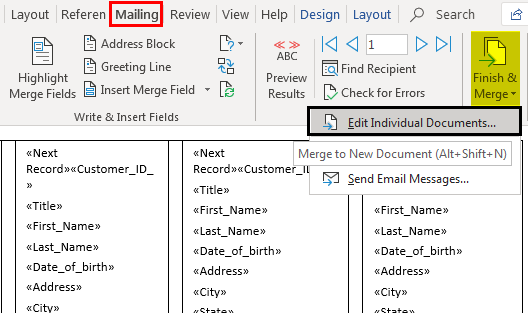
Go to "Finish & "Merge" and choose the option “Edit Individual Documents.”
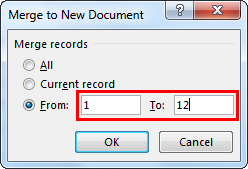
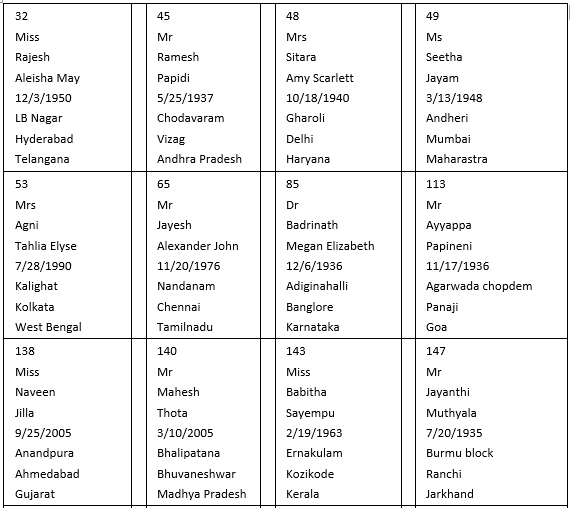
Insert the record numbers from 1 to 12 (varies based on the table size in the Excel sheet) to merge the data to the labels to the new document.
It will be displayed as given below.
- Step 5: Print the labels
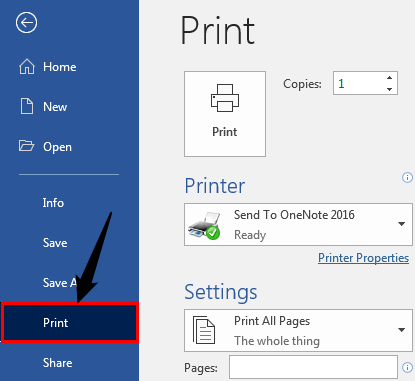
Go to the "Print" option in Excel "File" menu to print the labels.
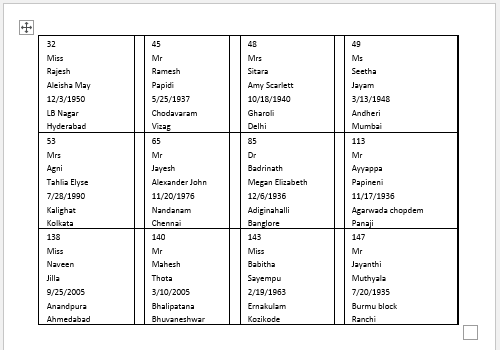
Finally, the labels are printed, as shown below.
Example #2 - Print Single Address Label From Excel Without Word
Follow the below steps to print a single address label from Excel without a word.
Use the Excel sheet with a tiny macro to rearrange the column data for printable address labels.
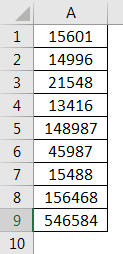
Insert data into column A.
Press the "CTRL+E" key to start the Excel macro.
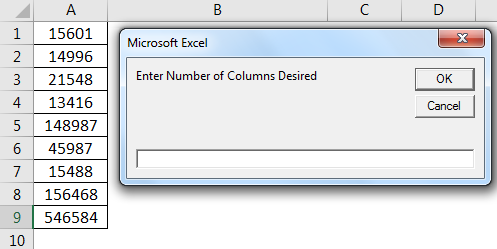
Enter the number of columns to print the labels.
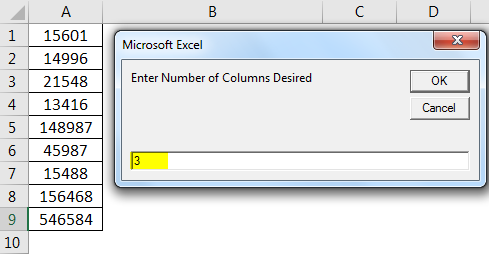
Then, the data is displayed.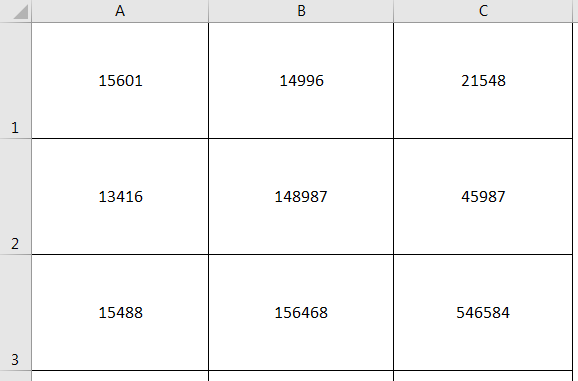
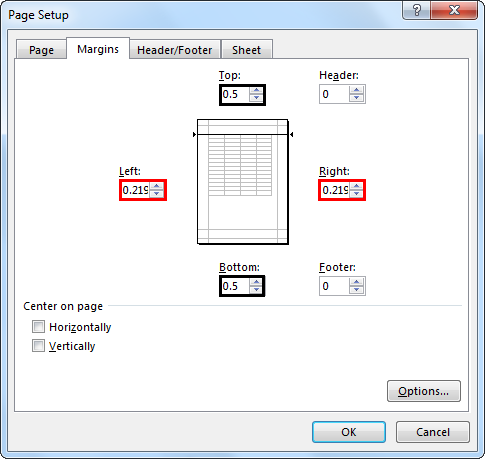
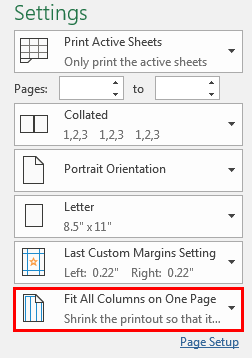
Set the custom margins as top=0.5, bottom=0.5, left=0.21975, and right=0.21975.
Set the scaling option to “Fit all columns on one page” in the "Print Settings" and click on "Print."
Example #3
Consider the below scenario where we have to print labels from Excel using Word.
Step 1: To begin with, arranged the data with headers.
Next, select the list of addresses in the Excel sheet, including the header.
Step 2: Go to the “Formulas” tab and select “Define Name” under the group “Defined Names.”

A dialog box, ‘New Name’ will appear. Give a name and click on “OK” to close the box.
Step 3: Create the mail merge document in the Microsoft word. Place the cursor over the "Mailings" tab and select the "Start mail merge" option. Then, choose the "Labels" option as shown in the figure.

Then, we can see the "Label Options" dialog box, as shown in the figure.

Click on the "Details" tab to preview the label properties.

After changing the measurements, click on "OK". We will be able to see a preview.

Click on the "Design" tab to add table styles to the labels.
Step 4: Link the labels from the existing list from Excel to the mailing list.
Go to the "Mailings" tab and choose the “Use an Existing List” option from the select participant’s category.

It displays the "Select Data Source" dialog box.
First, choose the Excel sheet where we have created the table. Next, click on “Open.”
Next, choose the table name and click on the “OK” button.
Now, we can see the page as shown in the below image.

Step 5: Arrange the labels in the table.
Place the cursor in the first record of the table and insert the labels. To do this, click on the “Insert Merge Field” button.

Click on each label one by one. While inserting the labels focus on the arrangement of labels and press the “Enter” key to add a label to the next line.
Next, click the “update labels” option to apply the same format to the remaining table records. Then, the page is displayed.

Go to "Finish & "Merge" and choose the option “Edit Individual Documents.”

Insert the record numbers from 1 to 12 (varies based on the table size in the Excel sheet) to merge the data to the labels to the new document.

Step 6: Print the labels.
Go to the "Print" option in Excel "File" menu to print the labels.

Finally, we will be able to print the labels.
Important Things To Note
- Do not forget to save a label created for reports and invoices. It supports the use of the labels in the future.
- Using the label templates in word saves a lot of time in creating and printing labels.
- Ensure that the Excel sheet does not present empty cells, rows, and columns to avoid inappropriate results while merging in a Word document.
- Create individual columns for the first name, last name, and title headers instead of one to segregate the recipient information.
