Table Of Contents
What is Insert Row in Excel?
The insertion of an excel row is simply the addition of a new (blank) row to the worksheet. The insertion of a row is eased with the help of shortcuts. A shortcut reduces the time taken to perform a task. This is because pressing a single key or combinations of keys help shorten an otherwise lengthy process.
For example, while working on some financial entries, a bank executive noticed that a row containing the totals of the columns is missing. A quick insertion of a blank row is carried out with the help of the shortcut keys “Ctrl+Shift+plus sign (+).”
Shortcuts considerably improve the productivity of the Excel users. These shortcuts need not be memorized. This is because, with regular usage, one tends to learn them.
This article discusses the major shortcuts of inserting a row in Excel. For better clarity, all techniques have been explained with the help of examples.
Top 3 Keyboard Shortcuts to Insert a Row in Excel
The top three shortcuts to insert a row in Excel are listed as follows:
- “Ctrl+plus sign (+)” or “Ctrl+Shift+plus sign (+)”
- “Insert” dialog box
- “ALT+I+R”
Use the shortcut which works on your device and is easy to be applied. Once the insertion of a row is complete, one can press F4 to repeat the last task.
Let us consider some examples to understand the working of these excel shortcuts.
Example #1–Insert a Row Using “Ctrl+Plus Sign (+)” or “Ctrl+Shift+Plus Sign (+)”
The following image shows the names (column A) and the date of birth (column B) of ten people. We want to perform the following tasks:
- Insert a new row 6 with the shortcuts “Ctrl+plus sign (+)” or “Ctrl+Shift+plus sign (+).”
- Show how to format the newly inserted row (row 6).
The steps to insert a new excel row (row 6) are listed as follows:
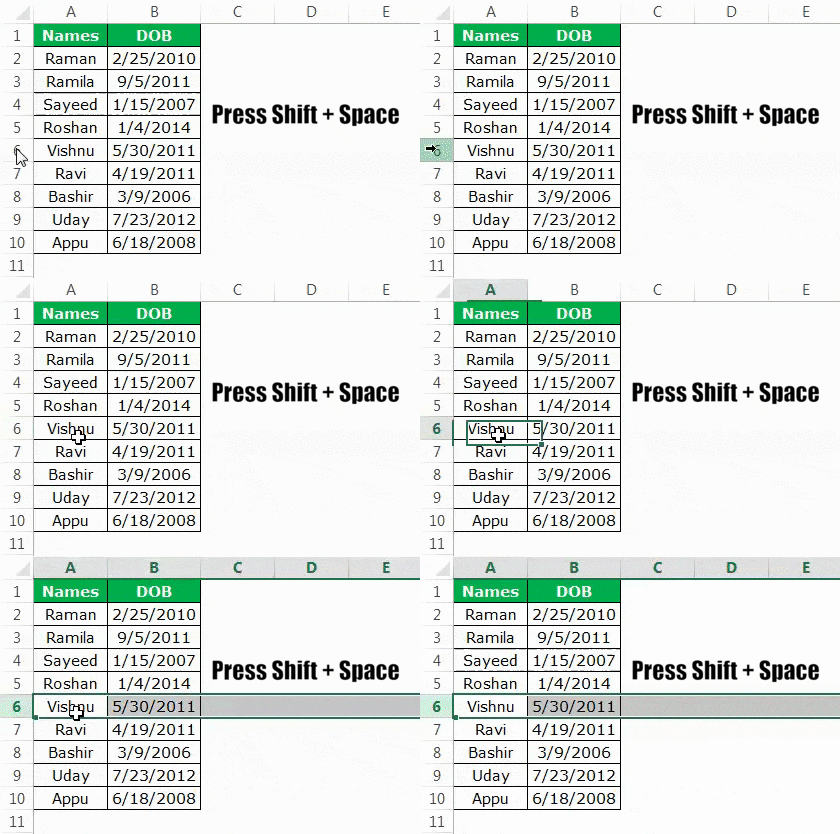
- Select any cell of row 6. Press the shortcut keys “Shift+spacebar” together. The entire row 6 is selected, as shown in the following image.
- Once the entire row is selected, press the keys “Ctrl+plus sign (+)” or “Ctrl+Shift+plus sign (+).” The keys of each shortcut must be pressed together.
In the succeeding image, we have applied the former shortcut .
Note 1: The shortcut “Ctrl+plus sign (+)” works only on those devices which have a numeric keypad (number pad) to the right of a regular keyboard. For this shortcut to work, press the “Ctrl” key from the regular keyboard and the plus sign (+) from the number pad.
Note 2: The shortcut “Ctrl+Shift+plus sign (+)” works on devices which do not have a separate numeric keypad. Such devices have a regular keyboard.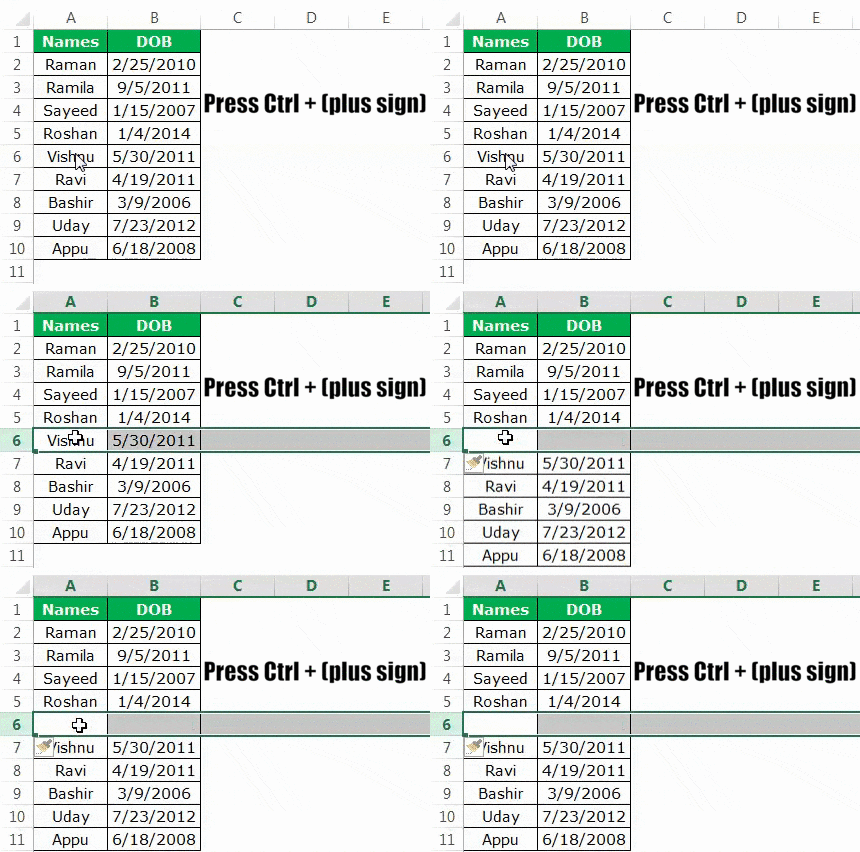
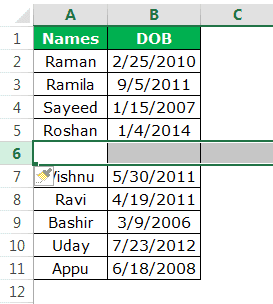
- A blank row 6 is inserted with both the preceding shortcuts (entered in step 2). This new row is shown in the following image.
With the insertion of the new row 6, the entries of the initial row 6 are shifted downwards to row 7. Moreover, a paintbrush icon appears immediately below the newly inserted row (row 6).
- To format the new row 6, hover the mouse over the paintbrush icon. Thereafter, click the drop-down arrow, as shown in the succeeding image. The formatting styles displayed are explained as follows:
• Format same as above: This applies the formatting of the immediately preceding row (row 5) to row 6.
• Format same as below: This applies the formatting of the immediately following row (row 7) to row 6.
• Clear formatting: This removes the formatting of row 6.
One can select any of the preceding styles. Based on this selection, the newly inserted row (row 6) is formatted.
Note: The paintbrush icon may not appear each time a new row is inserted. In case it does not appear, one can format the newly inserted row in either of the following ways:
• Select the newly inserted row, right-click and select “format cells” from the context menu.
• Use the format painter icon from the “clipboard” group of the Home tab of Excel.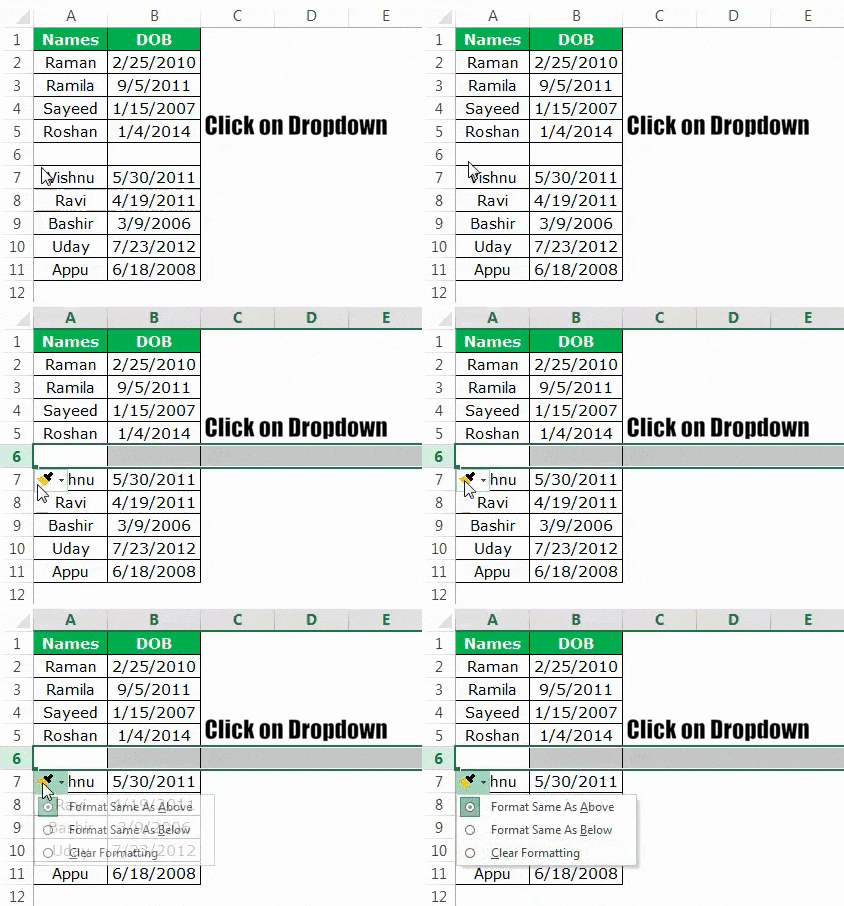
Example #2–Insert a Row Using the “Insert” Dialog Box
Working on the data of example #1, we want to insert a new row 6 with the “insert” dialog box. Use the shortcut method.
The steps to insert a row with the “insert” dialog box are listed as follows:
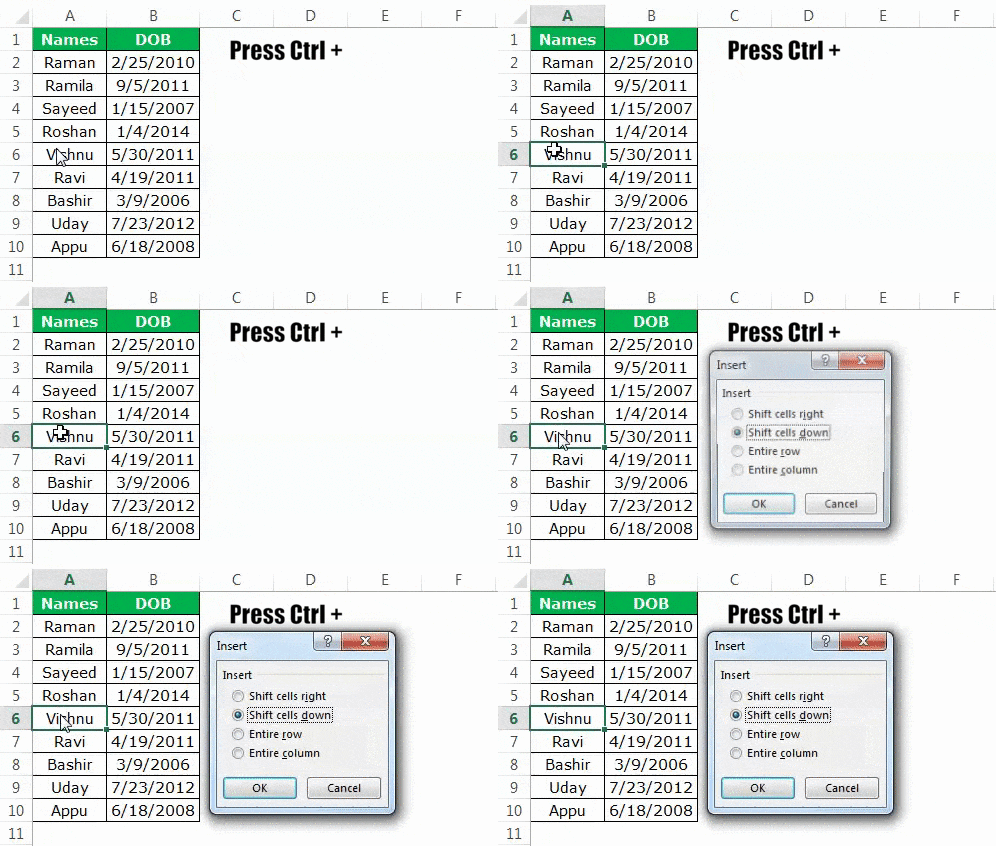
Step 1: Select any cell of row 6. Press the keys “Ctrl+plus sign (+)” or “Ctrl+Shift+plus sign (+).” The keys of each shortcut must be pressed together.
The “insert” dialog box opens with both these shortcuts. The succeeding image shows the result of using the former shortcut .
Note 1: The shortcut “Ctrl+plus sign (+)” works with keyboards having a numeric pad on the right side. The shortcut “Ctrl+Shift+plus sign (+)” works on all the regular keyboards.
Note 2: If a cell is selected prior to pressing the preceding shortcuts (entered in step 1), the “insert” dialog box is displayed. However, if a row is selected, these shortcuts insert a new row directly.
Step 2: The “insert” dialog box displays the following options:
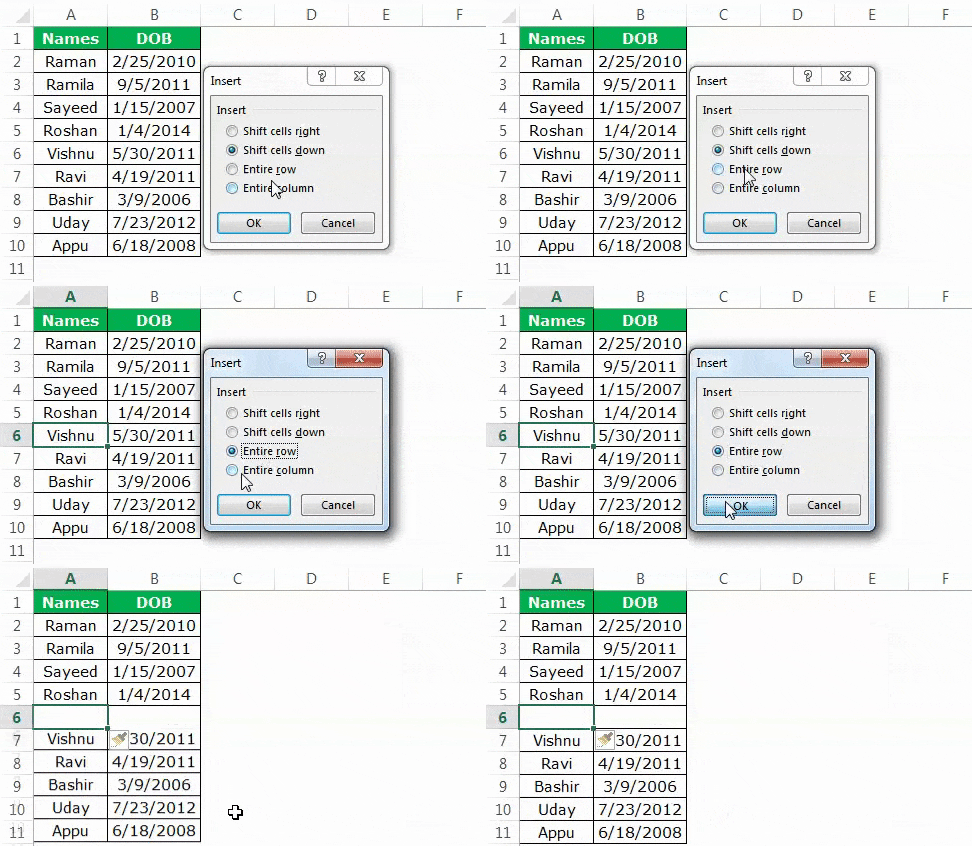
- Shift cells right: This shifts the content of the selected cell (selected in step 1) to the cell on the immediate right.
- Shift cells down: This shifts the content of the selected cell (selected in step 1) to the immediately following cell.
- Entire row: This inserts a new row preceding the row of the selected cell (selected in step 1).
- Entire column: This inserts a new column to the immediate left of the selected cell (selected in step 1).
Since we want to insert excel row 6, we select the option “entire row.” A new, blank row 6 is inserted, as shown in the following image. With this insertion, the entries of the initial row 6 shift to row 7.
Example #3–Insert a Row Using “ALT+I+R”
Working on the data of example #1, we want to insert a new row 6 with the shortcut “Alt+I+R.”
The steps to insert a row with the shortcut “Alt+I+R” are listed as follows:
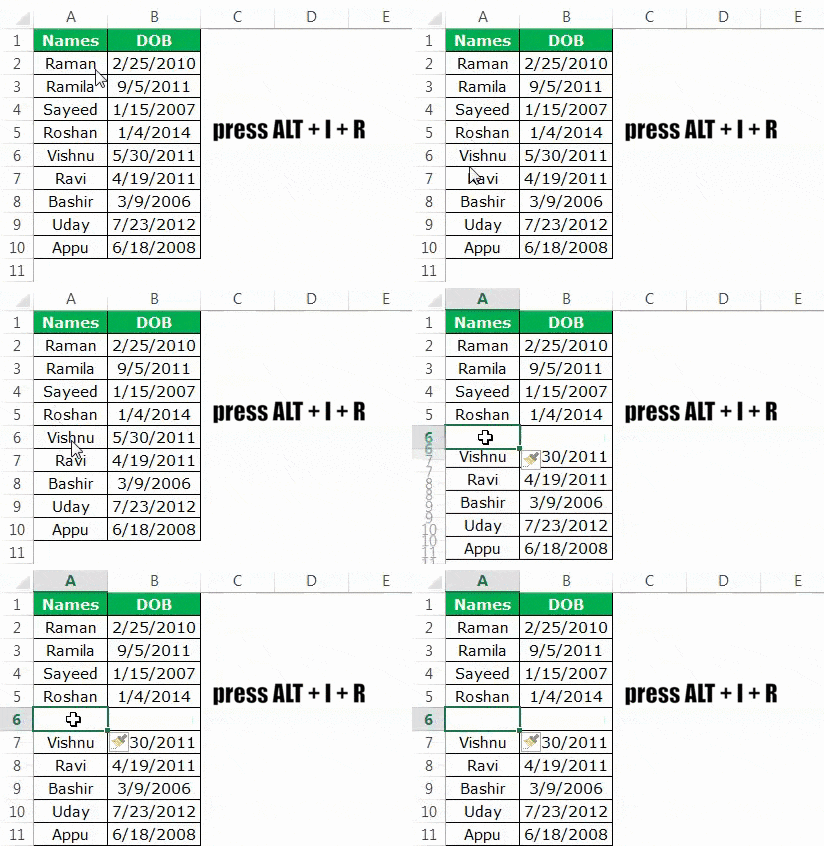
Step 1: Select any cell of row 6. We have selected cell A6, as shown in the following image. Alternatively, one can select the entire row 6 with the help of “Shift+spacebar.”

Step 2: Press the keys “ALT+I+R” to insert a new row. A blank row 6 is inserted, as shown in the following image. With this insertion, the entries of the initial row 6 shift to row 7.
Note: The shortcut “ALT+I+R” does not work in all the versions of Excel. It works only in the modern versions of Excel.
How to Insert Multiple Rows Using a Shortcut Key?
Let us consider an example to understand the insertion of multiple rows with the help of shortcuts. For inserting multiple rows, one must know beforehand the number of rows to be inserted. This is because Excel inserts the same number of rows as the initial rows selected.
Example #4–Insert Multiple Rows Using “Ctrl+Plus Sign (+)” or “Ctrl+Shift+Plus Sign (+)”
Working on the data of example #1, we want to insert five rows (row 6 to row 10) beginning from row 6. Use the shortcut method.
The steps to insert multiple rows by using shortcuts are listed as follows:
Step 1: Select rows 6 to 10. This is because we want to insert five rows starting from row 6. The rows can be selected in either of the following ways:
- Select cell A6. Hold the “Shift” key and press the down arrow to select the cells A6 to A10. Press “Shift+spacebar” to select rows 6, 7, 8, 9, and 10 in one go.
- Press and drag the left button of the mouse on the row numbers 6, 7, 8, 9, and 10.
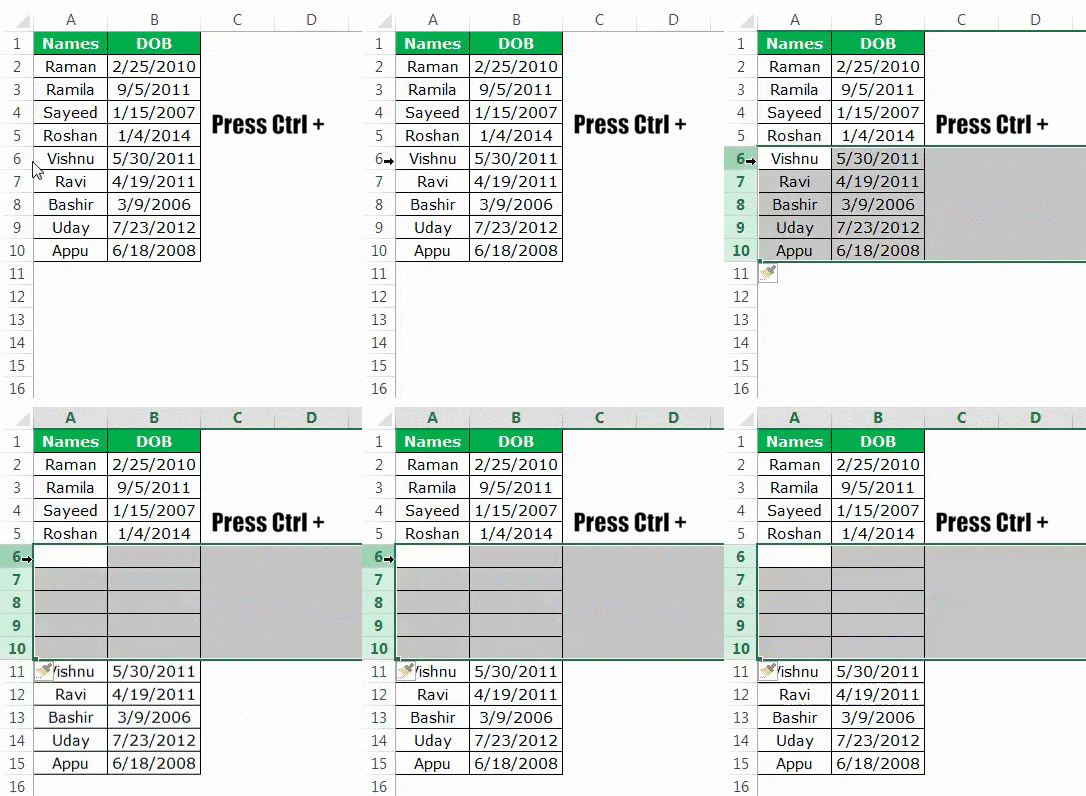
The selected rows are shown in the following image.

Step 2: Once the required number of rows is selected, press the keys “Ctrl+plus sign (+)” or “Ctrl+Shift+plus sign (+).” The keys of each shortcut need to be pressed together.
In the succeeding image, the rows 6, 7, 8, 9, and 10 are inserted with the keys “Ctrl+plus sign (+).” Hence, five blank rows are inserted beginning with row 6. With this insertion, the entries of the initial rows 6, 7, 8, 9, and 10 are shifted downwards to rows 11, 12, 13, 14, and 15.
Note 1: Use the shortcut “Ctrl+plus sign (+)” on the keyboard having a separate numeric keypad. On a regular keyboard, use the shortcut “Ctrl+Shift+plus sign (+).”
Note 2: If multiple rows are selected, both the preceding shortcuts (pressed in step 2) insert multiple rows. Since the number of inserted rows is the same as the number of rows selected initially, one must make the selections carefully (in step 1).
