Table Of Contents
Draw and Insert a Line in Excel
Earlier, if we needed to draw a particular shape in a document, it was done by a drawing program. The program was separate from the software itself. In this way, the software was dependent on the drawing program if there needed to be any connections drawn out.
But now, in Microsoft Excel, it is easier to draw shapes of any size or desire. So, for example, we can draw a circle, a line, a rectangle, or any shape.
How to Insert/Draw a Line in Excel?
Excel has provided us with the tools required to insert a line or shape or draw a shape in it, rather than depending upon any other third program. In addition, it has a variety of shapes that we can use as the situation requires.
One of the shapes is a "Line." The line is a collection of points that extends in both directions. We can use it to form certain shapes, such as squares or rectangles, or it can just be a straight line that has an infinite ending to both ends.
The main question arises: how do we draw a line in Excel?
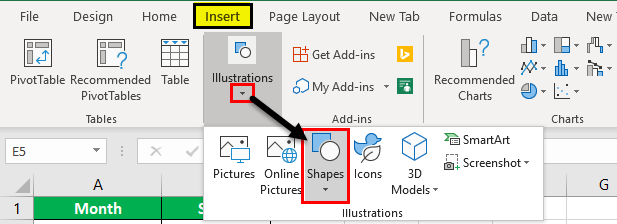
If we go to the "Insert" tab and in the "Illustrations" section, we will find an option for "Shapes."

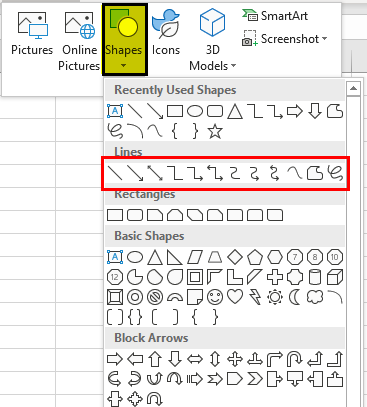
If we click on "Shapes," it gives us a variety of shapes to choose from. One of the varieties is the "Lines."

Now, in the line option, we have various types of line options to choose from:
- Line
- Arrow
- Double Arrow
- Elbow Connector
- Elbow Arrow Connector
- Elbow Double Arrow Connector
- Curved Connector
- Curved Arrow Connector
- Curved Double Arrow Connector
- Curve
- FreeForm
- Scribble.
All of these forms of lines are used as a connector in Excel. It shows the relationship, dependency, or connection in Excel. For example, suppose we have various cells with data but which cells refer to which data can be recognized by inserting a line or shape in Excel.
How to Draw a Line in Excel?
To draw a line in Excel, we must follow these steps:
- In the "Insert" tab under "Illustrations," click on "Shapes."
- When the dialog box appears, we must go to the "Lines" section,
- Select any line from the various given options to draw a connection.
Like this, we use the elbow arrow connector in "Lines."
Let us learn how to draw a line in Excel by a few examples:
Insert Line in Excel Example #1
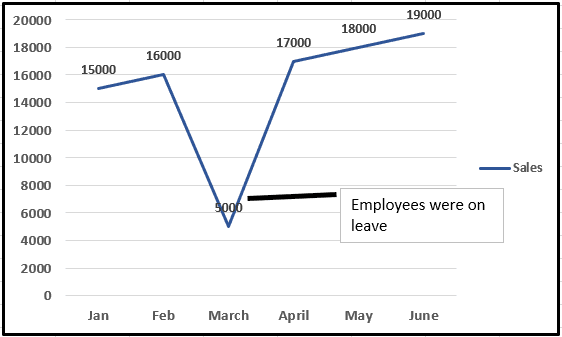
Suppose we have a chart for data. We can see that there is a dip in sales for a company. Rather than going through the whole data and analyzing the issue for a viewer, the chart author can add text to show the reason for the spike and draw a line in Excel to indicate the same.
Have a look at the chart below.

Looking at the chart, we see that they dipped in sales in March, but we do not know why.
We must first insert a text box and write the text for the dip in sales. Then, we must insert a line to indicate the reason.

Write the text in the text box.

Now, in the Insert tab under llustrations, click on Shapes.

A dialog box pops up for different shapes. Select the Lines menu.

In the Lines option, we can see the option for line shape, which is the first one.

Now, we must right-click on the mouse and start stretching the line to the extent we want it and release the mouse.

Next, in the Shape Outline option, click on Weight.

A dialog box pops up with the various weights or the dimensions for the line. Select anyone suitable like 3 points.

We have successfully drawn a line for the chart to indicate a connection.

Insert Line in Excel Example #2
Suppose we have an illustration such as below somewhere in our data. We want to show a relationship between them.

We will use the elbow arrow connector in line to show that the main is related to both sub 1 and sub2.
Step #1 - In the "Illustrations" under the "Insert" tab, click on "Shapes."

Step #2 - Again, a dialog box may appear for the various shapes.

Step #3 - This time, we will choose the "Elbow Arrow" connector, located in the fifth position from the start.

Step #4 - Now we know we need to show a relation between the main and the two subs. Right-click on the mouse from the main and release the mouse when we drag it to the sub 1 end.

Step #5 - This is the first connection. Now again, go to the "Insert" tab and, in "Illustrations," click on "Shapes."
Step #6 - Then, click on the "Elbow Arrow" connector in "Lines."

Step #7 - Again, start from the main by right click and release the click in the sub 2’s end.

Explanation of Draw Lines in Excel
The lines in Excel are inserted to show connections between two points.
We can also use it to draw shapes if used in free form. For example, "Draw the line" in Excel acts as a connector as in the above example. It showed the connection between the main and the other two subs.
Things to Remember
- Lines should start at one point and end at another point.
- To start inserting a line in Excel, we must right-click on the mouse, stretch the line, and release the click when we want to end the line.

