Table Of Contents
What Are Excel Forms?
Forms in Excel are a hidden feature of Excel. It is not available in Ribbon Tools. We need to add this feature using the Quick Access Toolbar option available under the “FILE” tab. The Excel Forms allow you to view, add, edit, and delete one record at a time in a horizontal orientation, which makes data entry easier.
Before adding the Excel Forms facility in Excel, certain points need to be remembered, or steps need to be performed:
- First, we need a table to insert data or at least column headers of the data.
Table of contents
- Excel forms are a hidden feature and is not available in Ribbon Tools.
- We can add forms in Excel using the Quick Access Toolbar option available under the FILE tab in workbook.
- Similarly, we can use only 32 input boxes or fields under this “Data Entry Form” table in Excel.
- The width of the input boxes depends on the worksheet column width in excel. So, we must ensure that the column width is sufficient to show values under the field.
Steps For Adding The Form Feature In Excel
Let us assume we have the following column headers or fields in which we need to enter the data:
- Product ID
- Product Name
- Quantity
- Price
- Amount
Below are the steps for adding the form feature in Excel:
- We must first enter these headings into the Excel column-wise.

- After that, we need to convert these “Column Names/ Headings” into a table and go to “Insert.” Then, click on “Table” under the “Tables “section. We may also press “CTRL+T.”

- Consequently, a dialog box may open for creating a table. Then, tick the checkbox “My table has headers” and click on “OK.”

- Now, the table may look like the below screenshot.

- Next, we need to go to “File.” A menu bar will open on the left. Then, click on the “Options” tab available in the left pane.

- A dialog box will open for “Excel Options.” Then, click on the “Customize Ribbon” tab in the left pane.

- As a result, it will open a dialog box for adding the ribbons/commands, which are not available at the initial stage. Then, click on “Choose commands from” dropbox as shown below.

- Now, it will show the following option: “Choose the Commands Not in the Ribbon.”

- It will display many options under this. Then, scroll the bar in the above-shown box and click on “Form.” Then, refer to the below screenshot.

- Then click on “New Tab,” as shown in the below screenshot.

- After clicking on “New Tab,” it will add “New Group” under this heading, as shown below screenshot denoted by a red box.

- We need to select next to the “New Group (Custom)” as shown in the below screenshot and click on “Add.”

- Consequently, it will add “Form” functionality under this. For example, refer to the below screenshot.

- We can rename the “New Tab (Custom)” and “New Group (Custom)” by using “Rename.” It is easy to understand from a future perspective. Like we replace this new word with form, refer to the below screenshot.

- While renaming the “New Group (Custom), it may also ask for an icon image. We can select the icon image and click on “OK.”

After renaming, it may look like the below screenshot.
- Now, exit from the “Excel Options” dialog box.
We can see a new tab added in the ribbon “Form Tab.” Refer to the below screenshot.
How To Create A Data Entry Form In Excel?
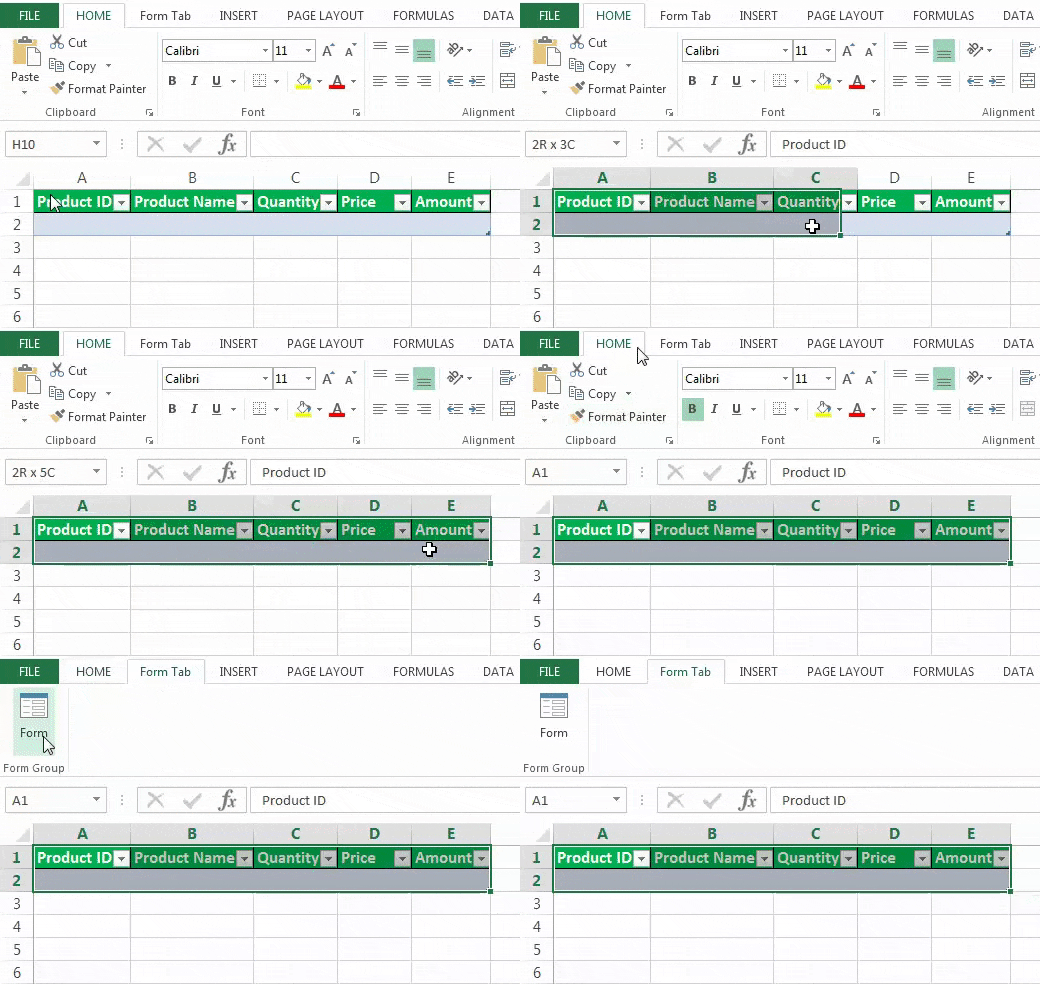
- Step 1: First, we must select the table and click on this “Form Tab,” then click on the “Form” option under the “Form” Group. Refer to the below screenshot.
- Step 2: A new dialog box will open, as shown below, screenshot.
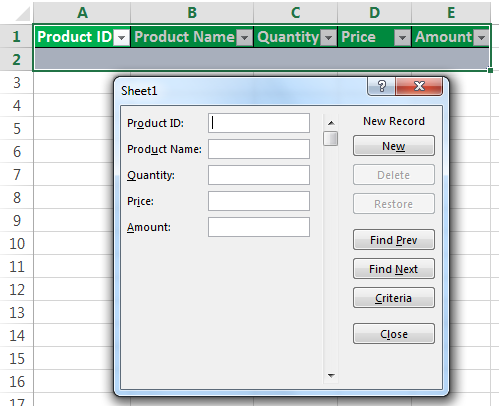
- Step 3: In the above screenshot, as we can see on the left side, there are labels that we created earlier as “column headers” of the table. Along with these labels, there are text boxes where we can insert the values/records/data one by one.
- Step 4: We must enter the data in each field. After filling all the fields, click on the “New” button to save this record.
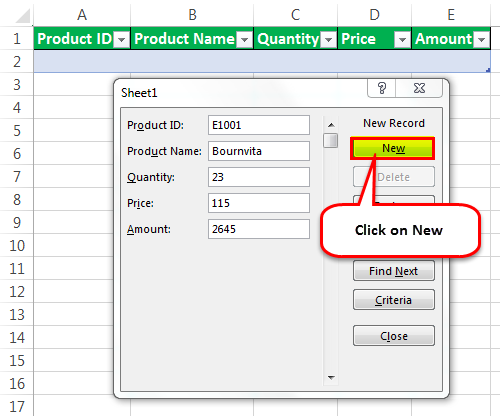

- Step 5: We can repeat this process for all the records we want to enter. After this, click on the “Close” button. Now, we can see the data in the Excel table. See below.

- Step 6: Now, we can use this "Form" facility for modifying the data into a table.
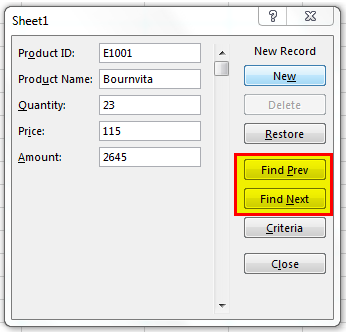
- Step 7: We can switch between the records using the “Find Prev” and “Find Next” buttons. Refer to the below screenshot.
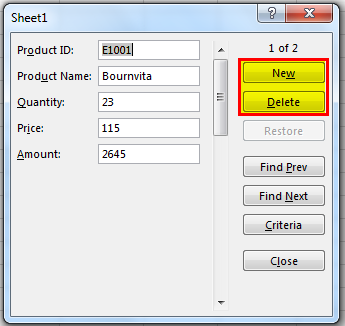
- Step 8: We can also use the “New” or “Delete” button to modify the records.
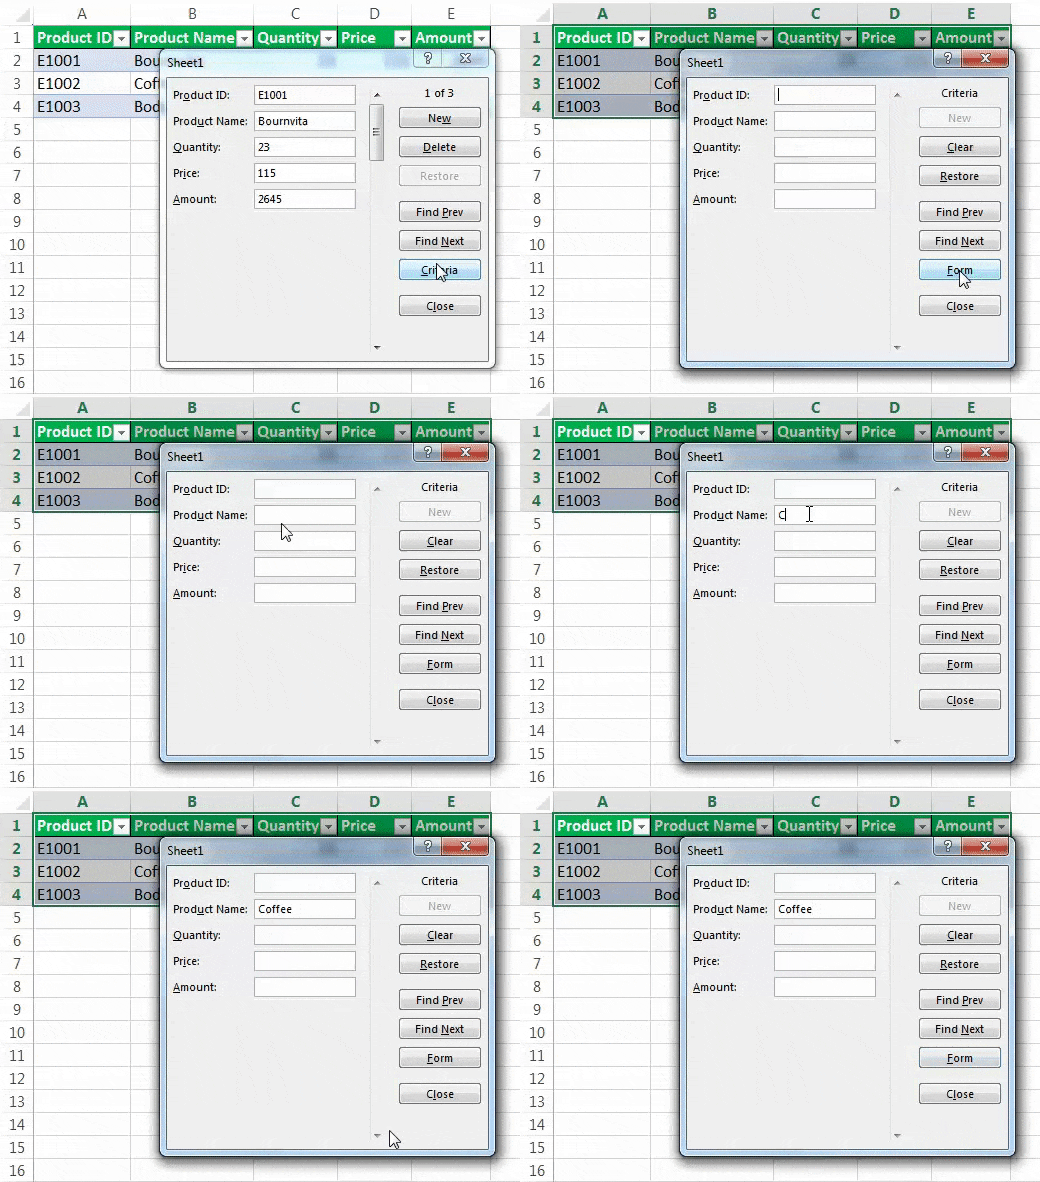
- Step 9: This “Form” feature provides important functionality, “Criteria.“ If we want to see only those records in the table which meet certain criteria/conditions, use this “Criteria” button.
For example, we want to see only “Coffee” product details in the above data. For these criteria, we must follow the below steps:
- Step 10: Click on the “Criteria” button. Enter the criteria. Here, we want to see only “Coffee” product details. Therefore, we must enter the product “Coffee” into the relevant field and click on the “Form” button.
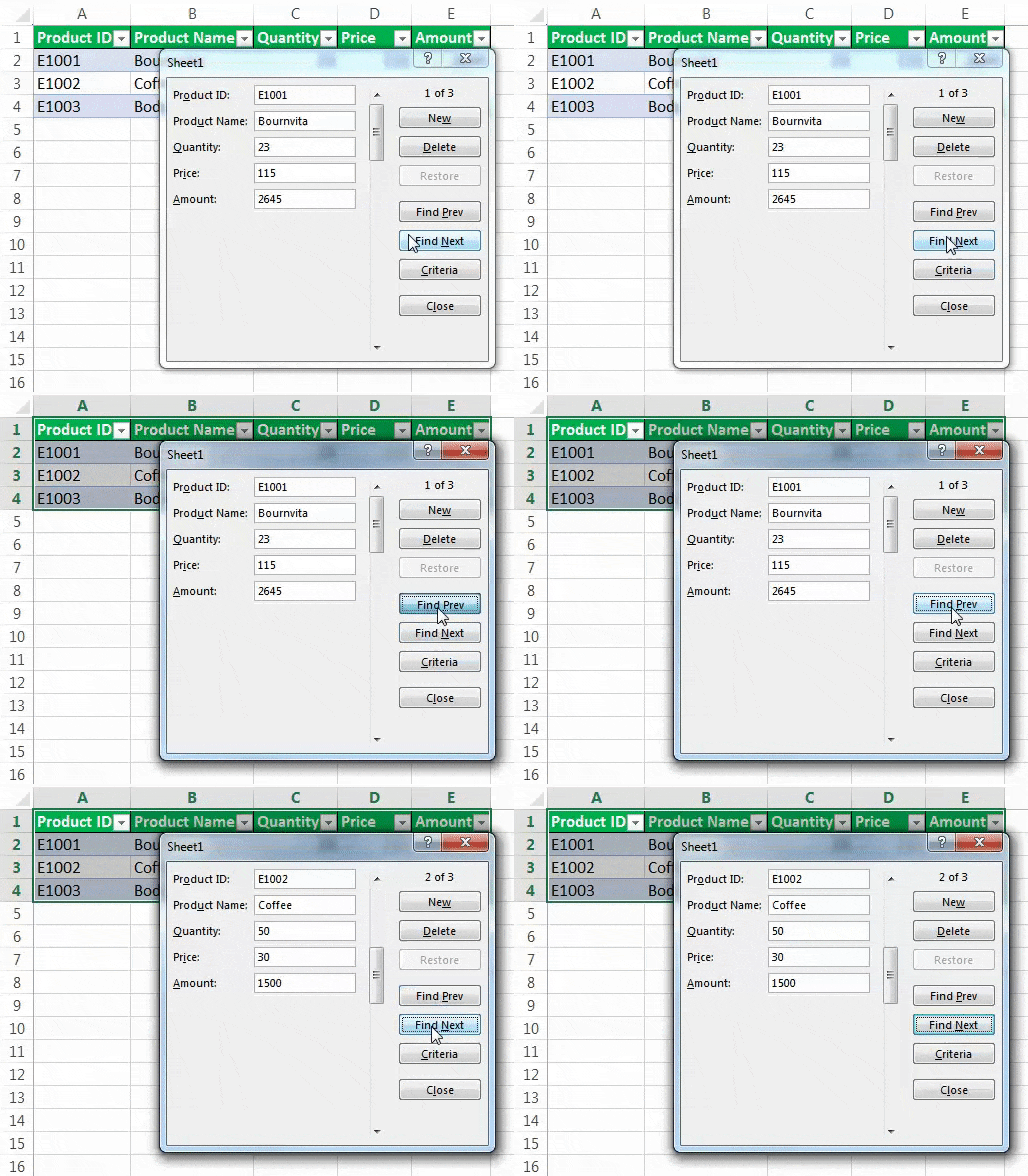
- Step 11: Now, if we click on “Find Prev” and “Find Next,” we can see only those records that meet that particular criterion.
- Step 12: We can edit these criteria anytime by clicking on this “Criteria” button again. Finally, click on the “Close” button for an exit.
Important Things To Note
- Excel forms are not available by default.
- We have to enable it from the Options available under File Tab.
- Remember to rename the tab after we enable Forms for easy use.
Frequently Asked Questions (FAQs)
Forms in Excel is a hidden feature, i.e., it is not available in Ribbon Tools by default. Therefore, we need to add this feature using the Quick Access Toolbar option available under the FILE tab.
Excel is one of the easiest application under Microsoft. Just like all the other functions, Excel Forms are also useful. It allows users to view, add, edit, and delete one record at a time in a horizontal orientation, which makes data entry easier.
Excel forms are useful as they are easy to add, view data. For example, consider the below image where we can see four columns, Name, Q1, Q2, Q3, and Q4.
Now, instead of maintaining the data as it is, we can easily convert it into an excel form.
To convert, select the column headers, A1, B1, C1, D1, and E1 respectively.
Then, press Ctrl + T and select My table has headers option in the Create Table window.
We can see that the data is now converted into a table.
Now, after enabling forms in Excel, click on Form option.
We can see the window as shown in the below image.
Here, we can not only add data but also perform functions like Find Next, Find Prev, Delete, etc.
Download Template
This article must help understand Excel Forms with its formulas and examples. You can download the template here to use it instantly.
Recommended Articles
This article is a guide to Data Entry Form in Excel. Here, we discuss creating a data entry form in Excel, practical examples, and a data entry form Excel template. You may learn more about Excel from the following articles: -
