Table of Contents
Key Takeaways
- The drop-down calendar is technically known as Microsoft Date and Time Picker Control in Excel.
- The Microsoft date picker does not work on the 64-bit version of Excel.
- The drop-down calendar is inserted with the help of ActiveX Controls in the Controls group of the Developer tab.
- The Microsoft Date and Time Picker Control 6.0 (SP6) is selected in the “more controls” box to insert the drop-down calendar.
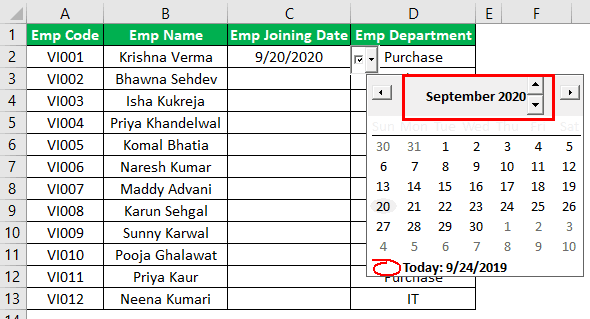
- In the drop-down calendar, the date, month, and year can be changed with the help of the various arrow buttons.
How to Insert Date Picker in Excel?
In Excel, the drop-down calendar is technically known as Microsoft Date and Time Picker Control. It is inserted with the help of ActiveX Control and is not available for the 64-bit version of MS Excel.
Example 1 –The Date Picker Insertion
We have the data of the employees of an organization. The different fields are–”employee code,” “employee name,” “employee joining date,” and “employee department.”
The Excel data is in the following format. We need a drop-down calendar to enter the joining date of the employee.
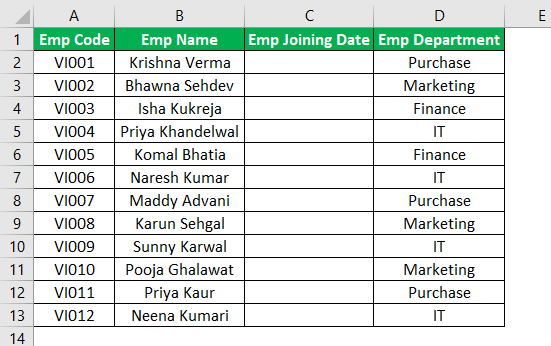
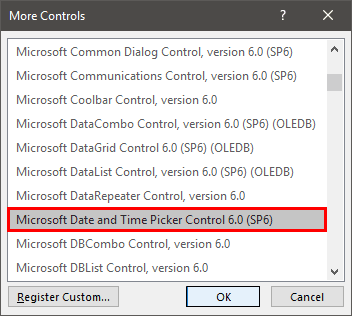
A drop-down calendar makes it easy for the user to enter the joining dates. For this, we insert an ActiveX Control named “Microsoft Date and Time Picker Control 6.0 (SP6).”
The steps to create a drop-down calendar are listed as follows (the first three steps make the Developer tab visible):
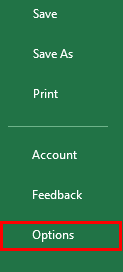
Step 1: Under the “file” menu, choose “options.”
Step 2: A dialog box named “excel options” opens. In the option “customize ribbon” (on the left edge of the dialog box), click on the checkbox for the “developer” tab. Click “Ok.”
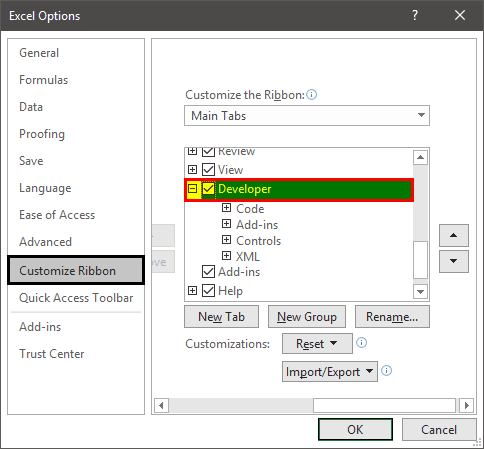
Step 3: The Developer tab appears at the end of the Excel ribbon.

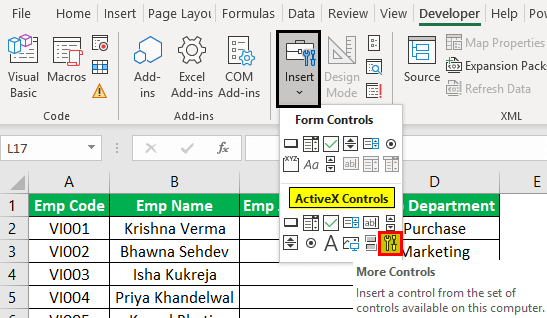
Step 4: In the Insert tab (under the Controls group), choose “more controls” from ActiveX Controls.
Step 5: Choose “Microsoft Date and Time Picker Control 6.0 (SP6)” from the list and click “Ok.”
Step 6: Click anywhere on the worksheet to create the drop-down calendar.
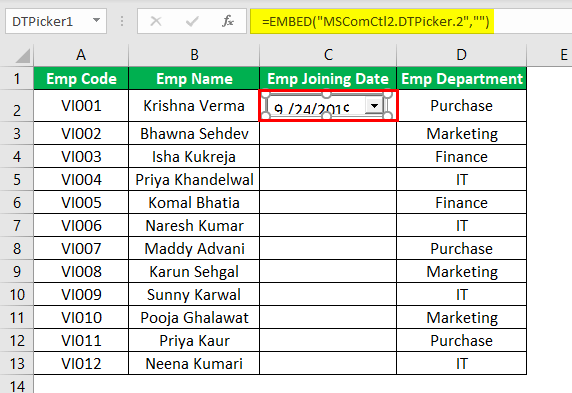
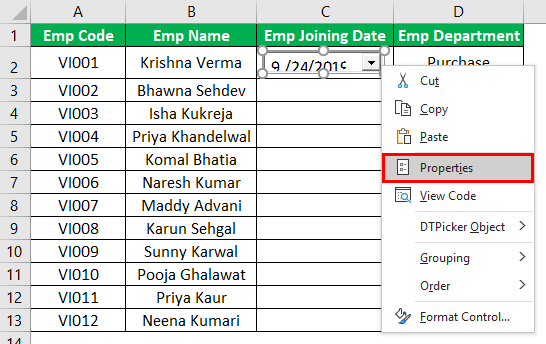
Step 7: Right-click on the date picker and choose “properties” from the list.
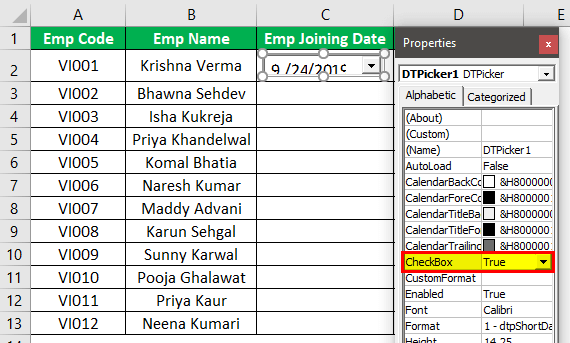
Step 8: In the “CheckBox” property, change the value from “false” to “true.” This allows the null values to be accepted. Close the “properties” dialog box.
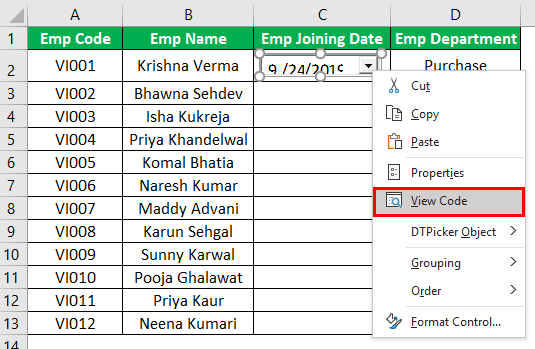
Step 9: Right-click on the date picker and choose “view code” from the contextual menu.
Step 10: In Visual Basic Editor, a code is already written. Replace this existing code with the following code.
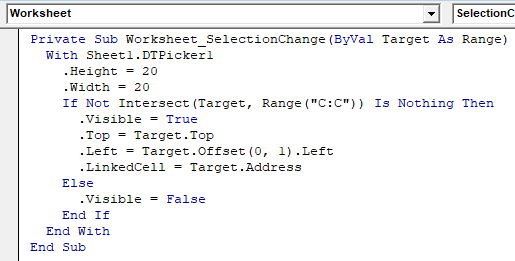
Private Sub Worksheet_SelectionChange(ByVal Target As Range) With Sheet1.DTPicker1 .Height = 20 .Width = 20 If Not Intersect(Target, Range("C:C")) Is Nothing Then .Visible = True .Top = Target.Top .Left = Target.Offset(0, 1).Left .LinkedCell = Target.Address Else .Visible = False End If End With End Sub
Example 2 –The Code Explanation
The explanation followed by the code within a block is given as follows:
#1 – The first statement tells the Excel compiler to run the code whenever a new cell is selected (i.e., the selection is changed). The selected cell is sent to the sub procedure as “target.”
Private Sub Worksheet_SelectionChange(ByVal Target As Range)
#2 – The next statement sets the height and the width of the date picker to 20 points in Excel.
Note: We use the “with” operator so that we do not refer to “DTPicker1” again and again.
With Sheet1.DTPicker1 .Height = 20 .Width = 20
#3 – The “If” clause sets the following criteria:
If any cell is selected in column C, only then does the date picker become visible. The “Intersect” function returns the address if a cell is selected in column C; otherwise, the value is null.
If Not Intersect(Target, Range("C:C")) Is Nothing Then .Visible = True
#4 – The “top” property of the date picker is equal to the “top” property value of the selected cell. This means that it goes along with the upper border of the selected cell.
.Top = Target.Top
#5 – The next statement sets the “left” property of the date picker equal to that of the next right cell (of the selected cell). This is the distance of the left border (of column D) from the extreme left of the worksheet.
Note: To get the reference of the next right cell, we use the “Offset” function with “0” as the row argument and “1” as the column argument. This gets a reference to the cell in the next column.
.Left = Target.Offset(0, 1).Left
#6 – This statement links the date picker with the target cell. It allows the value selected in the drop-down calendar to be displayed in the cell.
.LinkedCell = Target.Address
#7 – The “else” statement tells the compiler not to display the date picker when a cell other than that in column C is selected.
Else .Visible = False
#8 – At the end, we close the “If” statement.
End If
#9 – We also close the “with” statement.
End With
#10 – Now, the sub procedure ends.
End Sub
Note: The file should be saved with the extension “.xlsm.” This allows the VBA code to run when any cell is selected in column C.
Example 3 – The Date Picker Operation
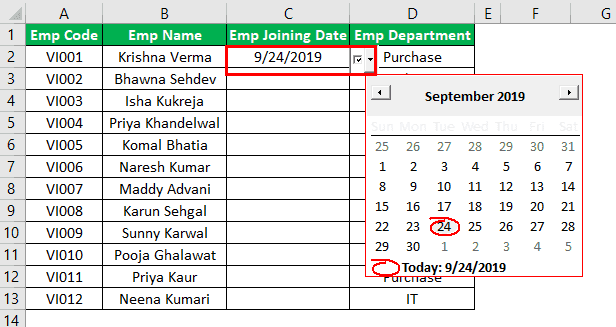
With the selection of a cell in column C, the drop-down calendar appears at the top right corner of the selected cell.
The working of the drop-down calendar is explained as follows:
- The drop-down calendar can be opened by clicking the down arrow.
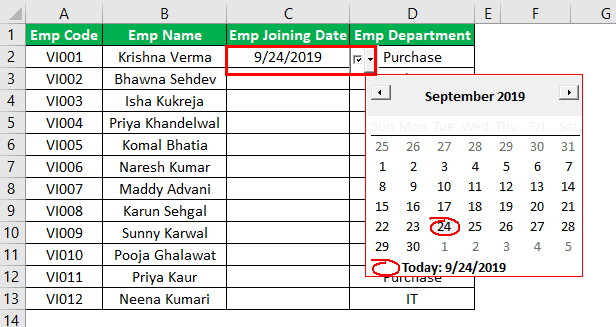
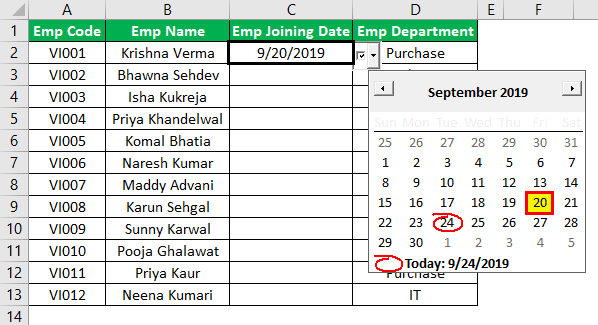
- To enter a date in the selected cell, click on that date from the calendar of the required month.
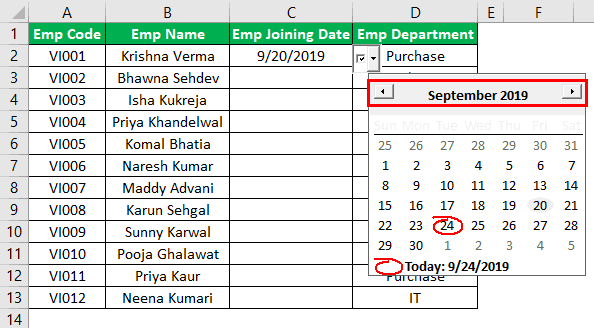
- To go to the previous or the next month, click the arrow buttons placed at the left and the right side of the calendar.
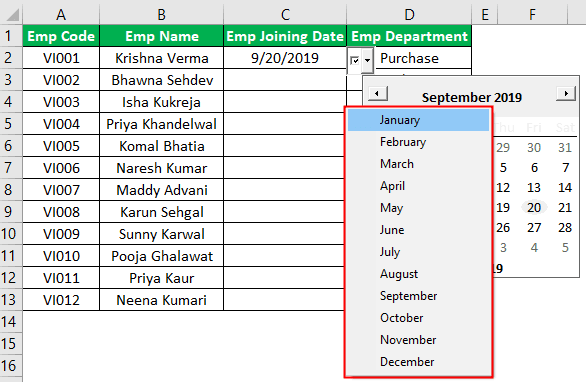
- The month can be chosen from the drop-down calendar by clicking on it.
- The required year can be chosen and changed by clicking the up and down arrow buttons.
