Table Of Contents
Column Width in Excel
Adjusting the column width is one of the important activities while working with Excel. It is one of the important activities performed by a user while preparing the reports, creating dashboards, developing summary tables, and using worksheets to do calculations on data. Microsoft Excel facilitates a set of options for changing the width of the column. However, columns in Excel worksheets cannot automatically adjust the width based on the data.

Key Takeaways
- A column in Excel has a default width of 8.43 characters, less than one inch.
- Excel presents different ways, including dragging through a mouse, using the shortcut menus on the ribbon, and double-clicking on the right side edge of the column heading.
- The present article discusses the various effective ways to adjust the width of columns manually by covering the following topics.
Explanation
- In an Excel worksheet, a user can set the width of a column in the range from 0 to 255, and one character width is equal to one unit. For a new Excel sheet, the column width equals 8.43 characters, equal 64 pixels. It will hide a column if its width is equal to zero.
- When a user inputs data into the columns of the excel sheet, they do not automatically adjust the size of the column. If the value presented in a cell is big to fit with the default width of the column, it overlaps with the next cells by crossing the border of the cell.
- The text string cell overlaps the cell border, whereas the numeric string displays in #####. Therefore, we need to apply various commands to adjust the column width to avoid these problems.
In Excel, a different type of command is available to format the width of a column. These include column width, AutoFit column width, and default width.
- Column width: This command sets the width of the column to a certain number of characters.
- Autofit column width: This command helps fit the content to the widest column width.
- Default width: Adjusts column width to the default width.
How to Adjust Column Width in Excel?
- Presenting the data in a readable format adjusting the column width.
- Matching the width of a column in excel to another column.
- Unhide data that is not visible to the readers.
- Setting the specific width to a column to fit with the content produced.
- Application of proper formatting to the cells and their data.
- Precisely controlling the column width by changing the different fonts and their size.
Examples
Below are examples of Excel column width.
Example#1 – Adjusting the Excel Column Width by Using the Mouse
This example illustrates the adjustment of the column width for the following data.

As shown in the figure, data in two columns is not readable. Therefore, we must follow the following steps.
Step1: To adjust the width of only one column, we must drag the border of the column to the right side until the required column width is reached.

Step2: Next, drag the column B width until the desired width is reached.

Step3: Next, we need to drag the column C width until the desired width is reached.

We can adjust the width of all columns by selecting the three columns.
Step4: After that, we must select three columns by pressing "CTRL+A" or clicking the ‘All Button’ and drag on any column header shown in the screenshot.

Consequently, it may show the result as follows:

Example#2 – Setting the Width of the Column to a Certain Number
The following data is considered for this example.

We must follow the steps to set the width of a certain number of columns in Excel:
- We must first select the single or more columns to adjust the width.

- Then, go to the "Format" option under the "Home" tab and click on "Format."

- Next, select the "Column width" from the list of options. It opens the "Column width" dialog box.

- Enter the desired value in the column width box (for example, 15) and click "OK."

- The result is obtained as follows:

This method results in the same width for the columns selected.
Example#3 – Use of AutoFit to Adjust the Column Width in Excel
This example illustrates the procedure to AutoFit the width of all columns to contents. The following data is considered for this example.

Step1: To AutoFit the single column, first, we need to double-click on the right border of the column.
Step2: To apply the AutoFit to two columns, double-click on the boundary presented by selecting the two columns.
Step3: To apply the AutoFit to all columns, select the columns by pressing "CTRL+A" or selecting the all button.

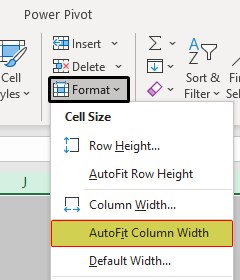
Step4: Go to the "Format" option under the "Home" tab and click on "Format."

Step5: Select the "AutoFit Column Width" from a list of options as shown in the screenshot.

It AutoFits the width of all columns, as shown in the screenshot.

Example#4 – Setting the Default Width for Columns in Excel
This example illustrates how to change the default column width for a worksheet or complete worksheets in a workbook. The following data is considered for this example.

Step1: First, we must select the single or more worksheets to adjust the default width. For this example, we are considering only one worksheet.

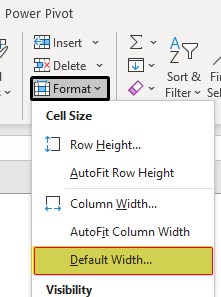
Step2: Go to the "Format" option under the "Home" tab and click on "Format."

Step3: We need to select the "Default Width" from a list of options, as shown in the screenshot.

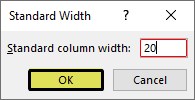
It opens the "Standard column width" dialog box.

Step4: After that, we must enter the desired width into the "Standard column width" box as 20.

Then, the result is obtained as follows:

Things to Remember
- "AutoFit" of column width does not affect width if the width of the column is sufficient for the content.
- When a user wants to modify the default width of an Excel file, save the empty workbook as a template in Excel.

