Table Of Contents
EDATE Function in Excel
The EDATE function is a built-in function in MS Excel. The EDATE function falls under the DATE and TIME functions in Excel. EDATE in Excel is used to get a date on the same day of the month, x months in the past or future. The EDATE function returns the date's serial number, the indicated number of months before or after the given start date. In addition, the EDATE function in Excel calculates expiration dates, maturity dates, and other due dates. To get a date in the future, use a positive value for months and a negative value for dates in the past.
Table of contents
- EDATE Function in Excel
- EDATE Formula in Excel
- How to Use EDATE Function in Excel?
- EDATE in Excel Example #1 – Get the same date 3 months later
- EDATE in Excel Example #2 – Add months to date
- EDATE in Excel Example #3 – Calculate the retirement date from the birth date
- EDATE in Excel Example #4– Calculate expiry date
- Things to remember about EDATE in Excel
- EDATE Excel Function Video
- Recommended Articles
EDATE Formula in Excel
Below is the EDATE formula in Excel:

The EDATE in Excel has two arguments. Both are required. When,
- Start_date = A date that represents the start date in a valid Excel serial number format.
- months = The number of months before or after start_date
How To Use EDATE Function in Excel?
The EDATE function in Excel is a Worksheet (WS) function. As a WS function, EDATE in Excel can be entered as a part of the formula in a worksheet cell. You may refer to a couple of examples given below to know more.
EDATE Function in Excel Worksheet
Let’s look at the EDATE Function examples given below. Each example covers a different use case implemented using the EDATE Excel function.
Video Explanation of EDATE Excel Function
EDATE in Excel Example #1 – Get the same date 3 months later
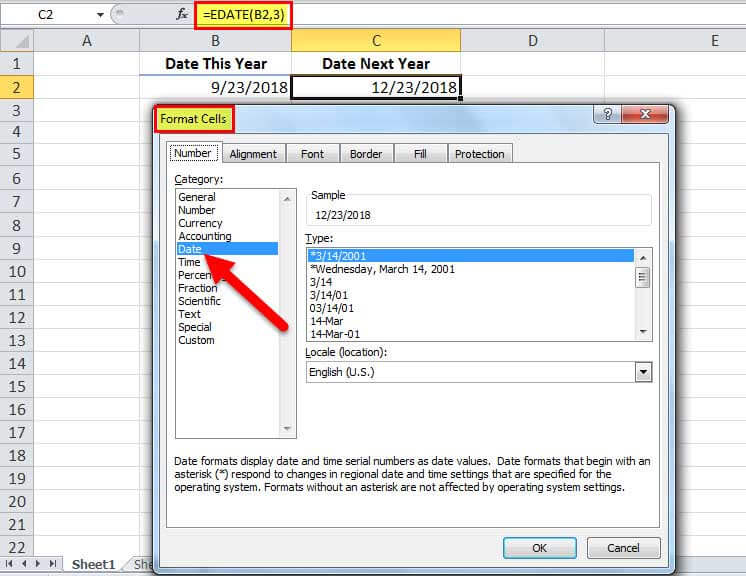
In the above example, EDATE(B2,3) returns a date three months later than the date mentioned in cell B2. For example, cell B2 has the date 23rd Sept 2018. So, the date after three months is 23rd Dec 2018, and the same is displayed as a result in cell C2, wherein the EDATE function is applied.
EDATE in Excel Example #2 – Add months to date
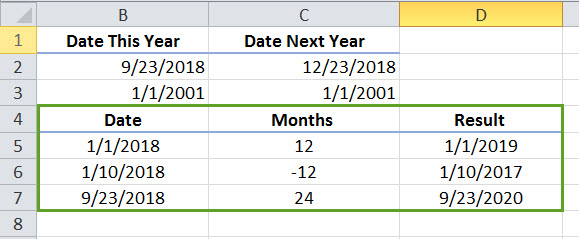
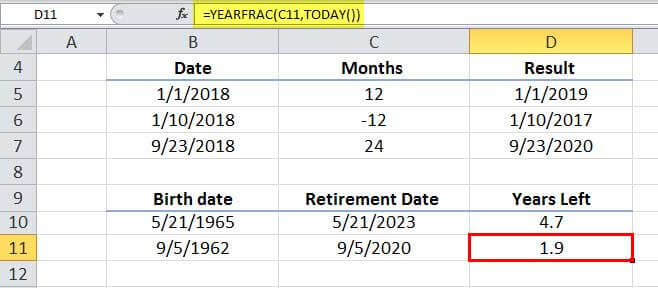
In the above example, cell B5 to B7 contains the source date.
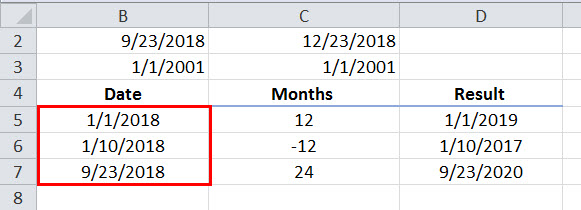
Cell C5 to C7 has the number of months to be added to the dates from the B column.
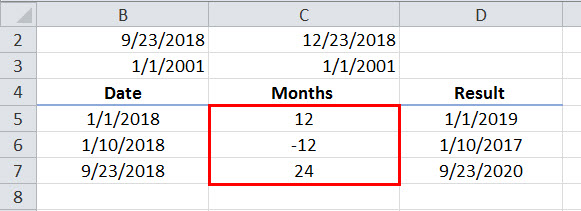
Finally, cell D5 to D7 contains the result date.
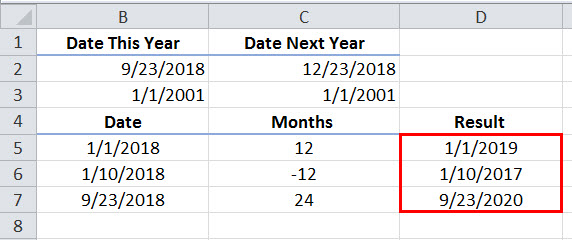
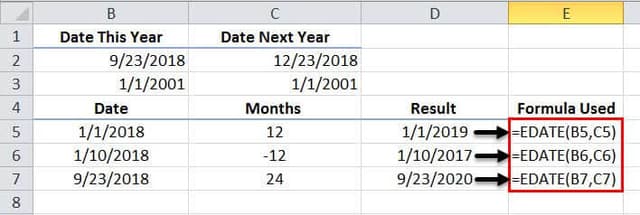
The EDATE function used is EDATE (B5,C5), EDATE (B6,C6), and EDATE(B7,C7), respectively.
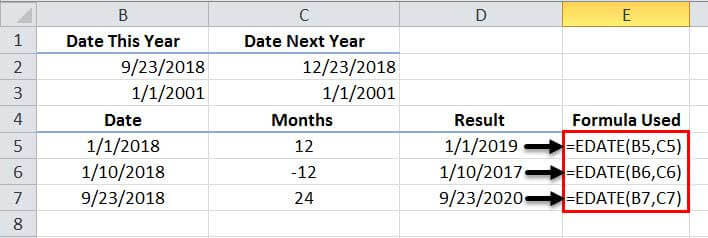
Row 5 is 1st Jan 2018, and 12 months are added to the date, resulting in 1st Jan 2019. Row 6, the date is 10th Jan, from which a year, i.e., 12 months, are deducted, resulting in the date as 10th Jan 2017. Finally, in row 7, the source date is 23rd Sept 2018, to which 24 months, i.e., two years, are added, and the result date is 23rd Sept 2020.
EDATE in Excel Example #3 – Calculate the retirement date from the birth date
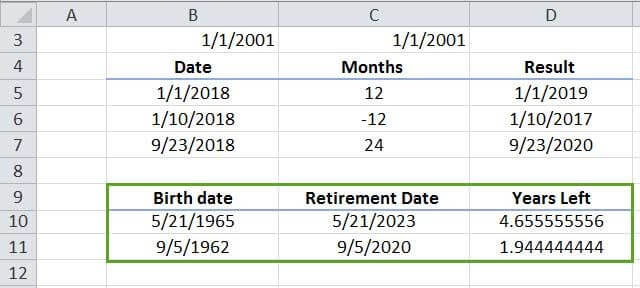
In the above example, the birth date is given. Then, the retirement date is calculated using the birth date (column B) and the retirement age criteria (column C). Finally, years left is another column (column D) wherein the number of years of service left is calculated using the YEARFRAC Excel function.
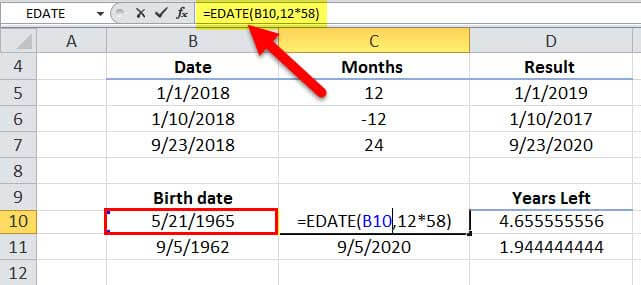
As shown in the above EDATE function in Excel 1 box, i.e., EDATE(B10,12*58), B10 contains the birth date, 21st May 1965.
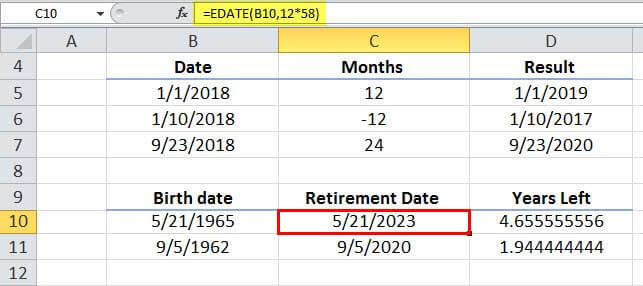
The above screenshot calculates the retirement date of 21st May 2023, 58 years after birth.
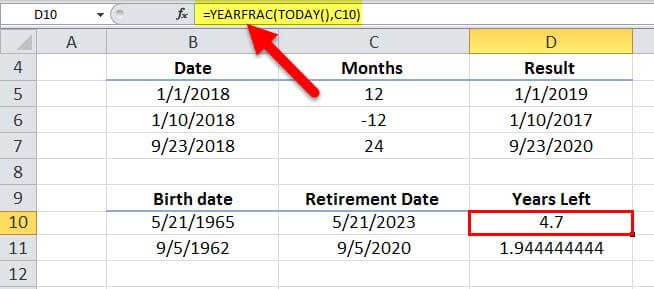
The second formula is YEARFRAC (TODAY (), C10), i.e., the difference between today’s date and the retirement date is 4 years and 7 months. For example, consider the screenshot given below.
The same EDATE function is applied to the remaining two rows, i.e., B11 and C11.
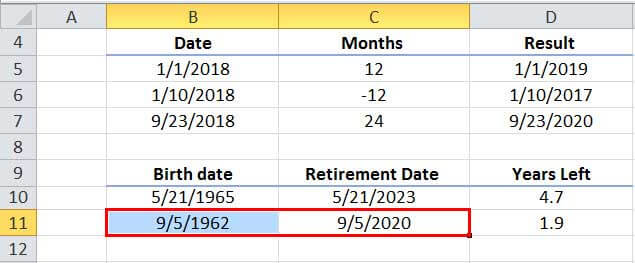
Cell B11 contains the birth date as 5th Sept 1962. The retirement date calculated is 5th Sept 2020, which is 58 years after the birth date
And the years left in cell D11 are calculated to be 1.9, which is 1 year 9 months after today’s date.
EDATE in Excel Example #4– Calculate expiry date
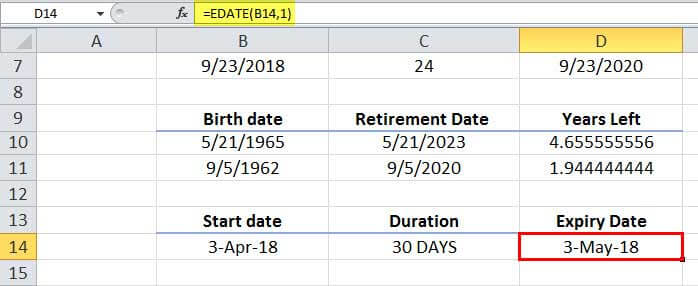
In the above example, cell B14 contains the product's start date or manufacturing date. Cell C14 has the duration for which we can consume the product. Cell D14 is the resulting cell, which indicates the product's expiry date. Here, 3rd April 2018 is the manufacturing date, and the duration is 30 days, which means one month. So, the EDATE formula applied is EDATE(B14,1), and the result is 3rd May 2018, which is one month after the start date. Cell D14 contains the result.
Things to remember about EDATE in Excel
- The second parameter of the EDATE Excel function must be a positive number.
- If start_date is an invalid date, EDATE in Excel returns the #VALUE! Error value.
- If months are not an integer, the value is truncated to be an integer.
- Microsoft Excel stores the date as sequential serial numbers so we can use them in calculations. By default, January 1st, 1900, is serial number 1, and January 1, 2001, serial number is 36892.
