Table Of Contents
What Is Convert Columns To Rows In Excel?
Convert columns to rows in Excel is a method used to convert the data column-wise into row-wise. It is essential to change the data column into row wise for easy access.
For example, consider the below table with large dataset showing marks obtained a set of students in various subjects.

Now, using convert columns to rows in Excel, we can change the data as shown in the below image.

key Takeaways
- In Excel, you can convert columns to rows. There are two approaches: the Excel Ribbon Method and the Mouse Method.
- Converting columns to rows or rows to columns: Both methods are also applicable when converting a single column to a row or vice versa.
- This option is highly advantageous and saves a significant amount of time at work.
- Using the Excel ribbon, one can convert columns to rows by copying and pasting. This data is beneficial to us, but one must see it in vertical order so that they can compare it easily.
How To Convert Columns To Rows In Excel?
There are two methods of doing this:
- Excel Ribbon Method
- Mouse Method
Let us take the below example to understand this process.
#1 - Using Excel Ribbon
We must follow the below steps for converting columns to rows:
- We must select the whole data and go to the "HOME" tab.
- Then, we must click on the "Copy" option under the "Clipboard" section. You may refer to the below screenshot. Else, press "CTRL +C" keys to copy the data.
- Then, we must click on any blank cell where we want to see the data.
- Next, we must click on the "Paste" option under the "Clipboard" section. You may refer to the below screenshot.
- As a result, this will open a "Paste" dialog box. Then, choose the option "Transpose," as shown below.
- Consequently, it will convert the columns to rows and display the data as we want.
#2 - Using Mouse
Follow the below steps for doing this:
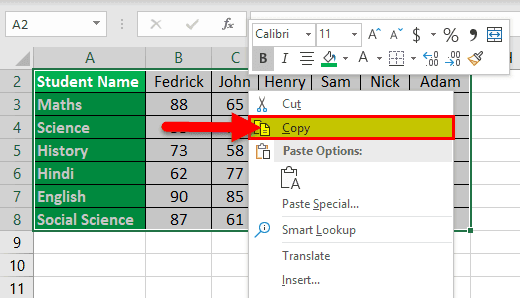
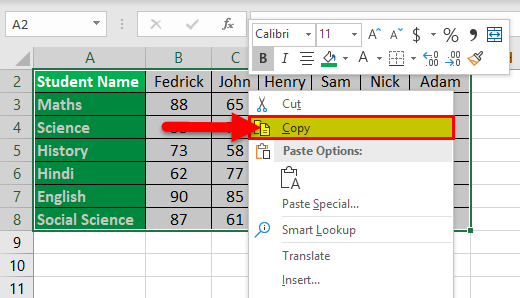
- Step 1: We must first select the whole data and right-click. As a result, it will open a list of items. Now, we must click on the "Copy" option from the list. You may refer to the below screenshot.
- Step 2: We need to click on any blank cell where we want to paste this data.
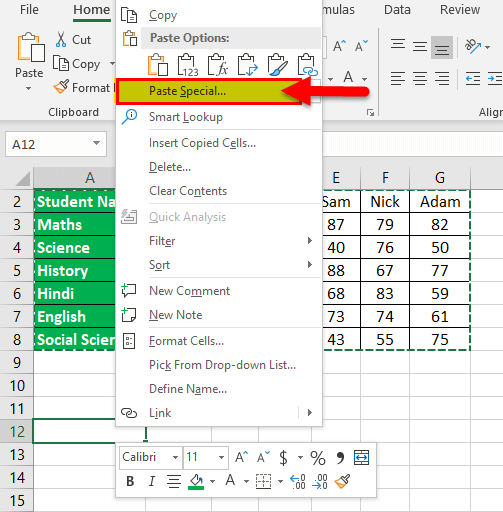
- Step 3: Again, right-click and select Paste Special option.
- Step 4: Again, it will open a "Paste Special" dialog box.
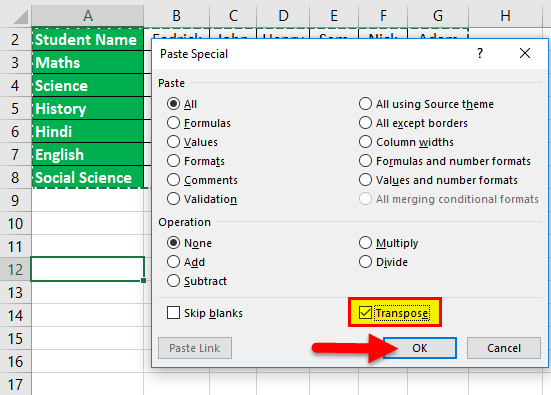
- Step 5: Then, click on the "Transpose option," as shown in the below screenshot.
- Step 6: Lastly, we must click on the "OK" button.
Now our data is converted from columns to rows.
Examples
Example #1 - Convert Columns To Rows With Copy And Paste
We have the sales data location-wise.

This data is very useful for us, but we want to see this data in vertical order so that it will be easy to compare.
We must follow the below steps for converting columns to rows:
- We must select the whole data and go to the "HOME" tab.
- Then, we must click on the "Copy" option under the "Clipboard" section. You may refer to the below screenshot. Else, press "CTRL +C" keys to copy the data.

- Then, we must click on any blank cell where we want to see the data.
- Next, we must click on the "Paste" option under the "Clipboard" section. You may refer to the below screenshot.

- As a result, this will open a "Paste" dialog box. Then, choose the option "Transpose," as shown below.

- Consequently, it will convert the columns to rows and display the data as we want.
The result is shown below:
Now, we can put the filter and see the data differently.
#2 - Using Mouse - Converting Columns to Rows (Or Vise-Versa)
Let us take another example to understand this process.
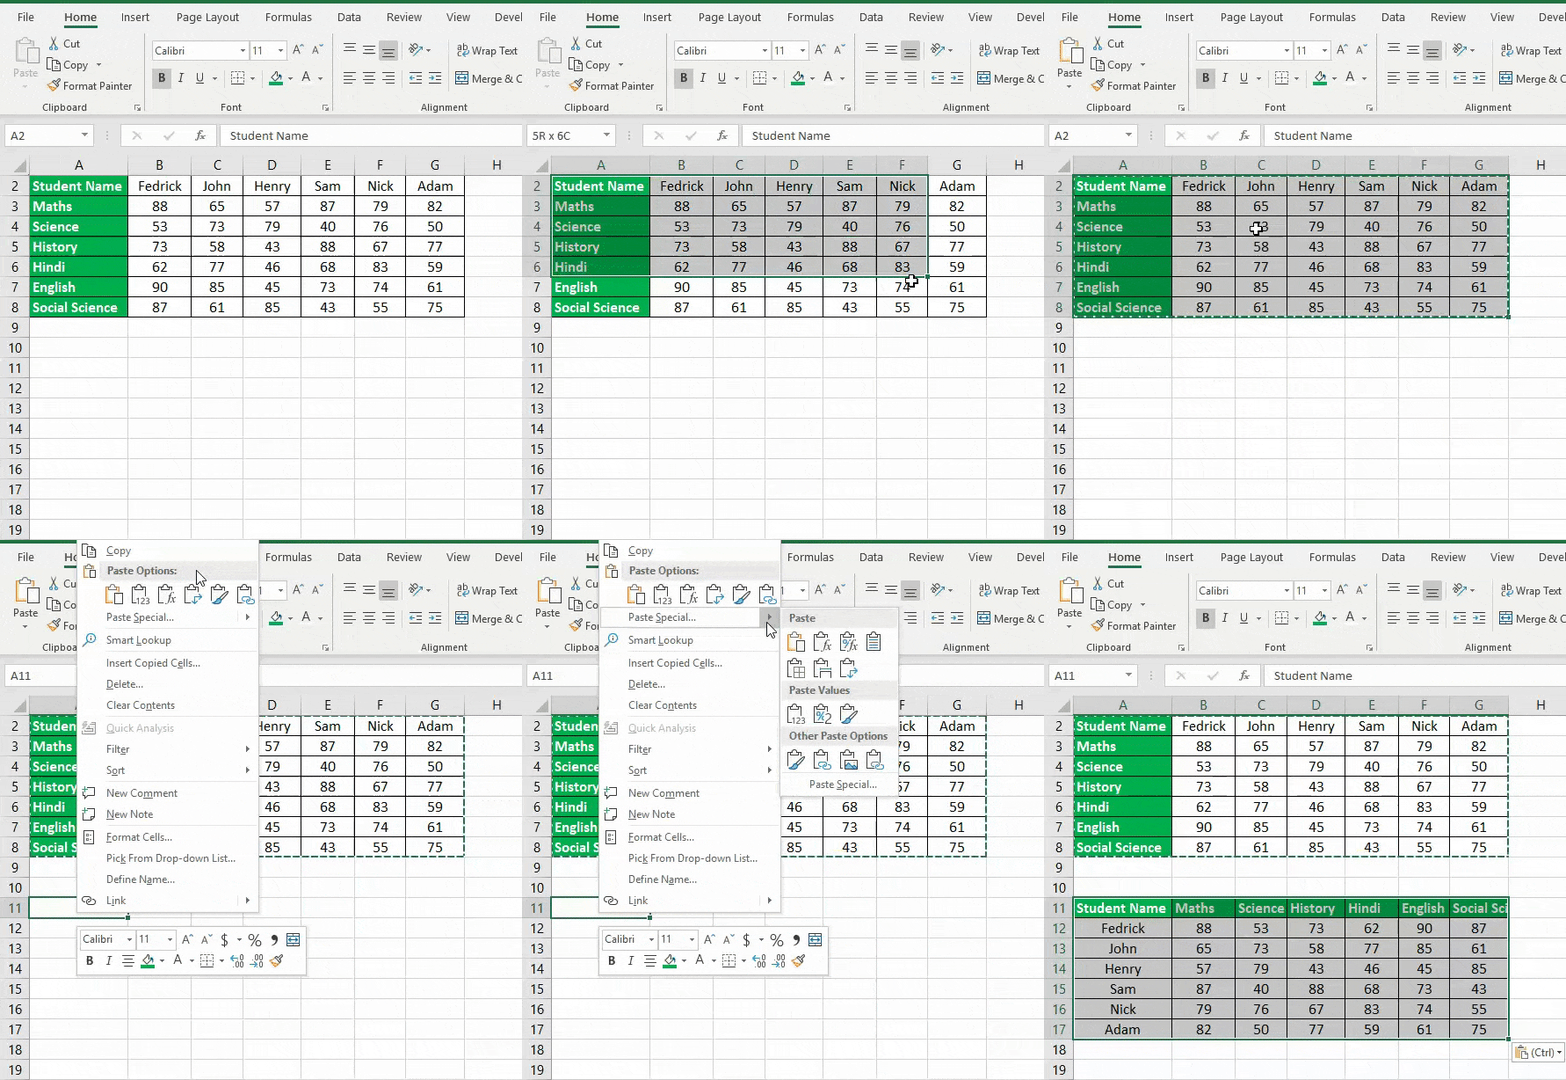
We have some student score data subject-wise.

Now, we have to convert this data from columns to rows.
Follow the below steps for doing this:
- Step 1: We must first select the whole data and right-click. As a result, it will open a list of items. Now, we must click on the "Copy" option from the list. You may refer to the below screenshot.
- Step 2: We need to click on any blank cell where we want to paste this data.
- Step 3: Again, right-click and select Paste Special option.
- Step 4: Again, it will open a "Paste Special" dialog box.
- Step 5: Then, click on the "Transpose option," as shown in the below screenshot.
- Step 6: Lastly, we must click on the "OK" button.
Now our data is converted from columns to rows. The final result is shown below:

In other ways, when we move our cursor or mouse on "Paste Special" option, it will again open a list of options as shown below:
Important Things To Note
- Converting columns to rows or vice-versa both methods also work when we want to convert a single column to a row or vice-versa.
- This option is very handy and saves a lot of time while working.
