Table Of Contents
What Is Automatic Numbering In Excel?
The Auto Numbering in Excel feature helps users to AutoFill series such as serial numbers, dates, months, a sequence, a pattern, etc., automatically. While performing a simple numbering in Excel, we manually enter serial numbers for the cells in a dataset. Therefore, we can avoid manual entering using the Auto Numbering feature.
For example, if we have a dataset and want to start numbering them from 3 and step up by 4 until 40.
- First, select the cells containing the 3 and the 7. Then, click on the handle and drag to the other cells where you can see 40. We may then release and view that the numbers are auto-filled.
- We can also use the Excel ROW function, =ROW() formula, that returns the row number for reference. For example, ROW(A3) returns 3 as A3 is the third row in the spreadsheet. If not given any reference, ROW returns the cell’s row number, which consists of the formula.
Key Takeaways
- Auto Numbering in Excel helps users auto-fill a series of numbers or a pattern of numbers, date series, etc., in a sequence in ascending or descending order.
- Auto Numbering is not an inbuilt function, so we use some methods such as Fill Handle, Fill Series, and the Row function to fill the required series.
- Some methods generate static numbering that remains constant, whereas others generate dynamic numbers that change when we add or delete the rows.
Auto Numbering in Excel Video
How To Auto Number In Excel?
We can Auto Number in Excel using two methods, namely,
- First, we can fill the first two cells with the series of the number we want to be inserted and drag it down to the end of the table.
- The second method is to use the =ROW() formula, which will give us the number, and then drag the formula similar to the end of the table.
Top 3 Ways To Get Auto Numbering In Excel
The three ways to get Automatic Numbering in Excel are,
- Fill a column with a series of numbers.
- Use the Row() function.
- Use the Offset() Function.
Examples
Let us discuss all the above methods with specific examples.
Example #1 – Filling the Column with a Series of Numbers
We have the following data:

The steps to insert Auto Numbering in “column A” are:
- We can select the cell we want to fill. In this example, we will choose cell A2.
- We will write the number we want to start with. Let it be 1, fill the next cell in the same column with another number, and let it be 2.

- To start a pattern, we have made the numbering 1 in cell A2, and 2 in cell A3. Next, we will select the starting values, i.e., cells A2 and A3.

- The arrow shows the pointer (dot) in the selected cell. Then, click on it and drag it to the desired range, cell A11.

Now, we have sequential numbering for our data, as shown above.
Examples #2 – Use the ROW() Function
We will use the same data to demonstrate the sequential numbering using the Row() function.
- Below is our data:

- We select the specific cell where we want to start our Auto Numbering (cell A2 in this case).

- We type ROW() in cell A2, and press “Enter.”

As a result, it gave us the numbering from number 2 since the Row function throws the number for the current row.
- To avoid the above situation, we can give the reference row to the Row function, as shown below.

- Next, we click on the pointer or the dot in the selected cell, and drag it to the desired range for the current scenario to cell A11.

- We have Automatic Numbering in Excel for the data using the Row function, as shown below.

Examples #3 – Using the Offset() Function
We can also achieve Auto Numbering in Excel using the Offset() function.
Let us use the same data to demonstrate the Offset function. Below is the data:

As we can see, we have removed the text written in cell A1 “Serial Number,” as the reference needs to be blank while using the Offset function.

The above screenshot shows the function arguments used in the Offset function.
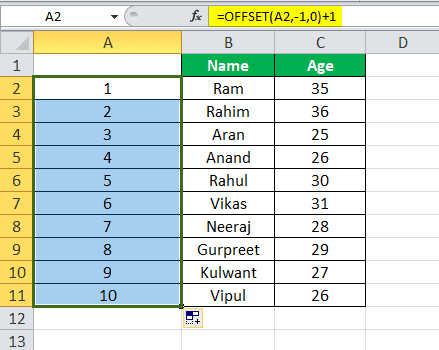
- Select cell A2, type offset(A2,-1,0)+1 for the Automatic Numbering in Excel.

Cell A2 is the current cell address, which is the reference.
- Press the “Enter” key. It will insert the first number.

- Now, we select cell A2, and drag it down to cell A11.

- So, now we got the numeric sequence using the Offset function, as shown below.

Important Things To Note
- Excel does not have an inbuilt auto-numbering feature.
- Do not forget to check to enable the “AutoFill” option.
- While filling a column with a series of numbers, we must make a pattern. We can use the starting values as 2 or 4 to create even sequential numbering.

