Table Of Contents
What are Add-ins in Excel?
An add-ins is an extension that adds more features and options to Microsoft Excel. Providing additional functions to the user increases the power of Excel. An add-in needs to be enabled for usage. Once enabled, it activates as Excel is started.
For example, Excel add-ins can perform tasks like creating, deleting, and updating the data of a workbook. Moreover, one can add buttons to the Excel ribbon and run custom functions with add-ins.
The Solver, Data Analysis (Analysis ToolPak), and Analysis ToolPak-VBA are some essential add-ins.
The purposes of activating add-ins are listed as follows: -
- To interact with the objects of Excel
- To avail an extended range of functions and buttons
- To facilitate the setting up of standard add-ins throughout an organization
- To serve the varied needs of a broad audience
In Excel, one can access several Add-ins from “Add-ins” under the “Options” button of the "File" tab. In addition, one can select from the drop-down “Manage” in the “Add-ins” window for more add-ins.
By default, it might hide some add-ins. One can view the unhidden add-ins in the "Data" tab on the Excel ribbon. For example, it is shown in the following image.

How to Install Add-ins in Excel?
If Excel is not displaying the add-ins, they need to be installed. The steps to install Excel add-ins are listed as follows:
- First, click on the “File” tab located at the top left corner of Excel.

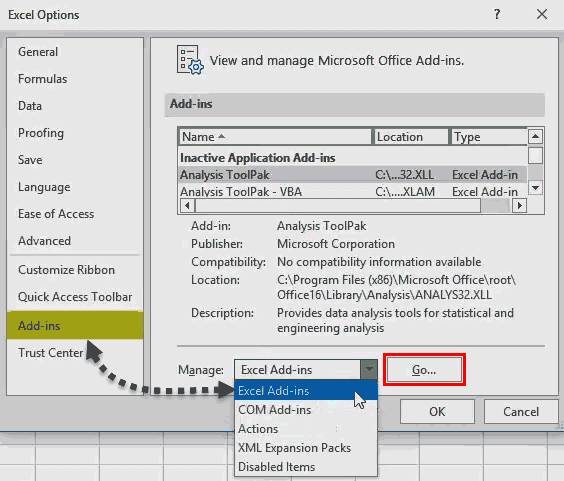
- Click “Options,” as shown in the following image.

- The “Excel Options” window opens. Select “Add-ins.”

- There is a box to the right of "Manage" at the bottom. Click the arrow to view the drop-down menu. Select "Excel add-ins" and click "Go."

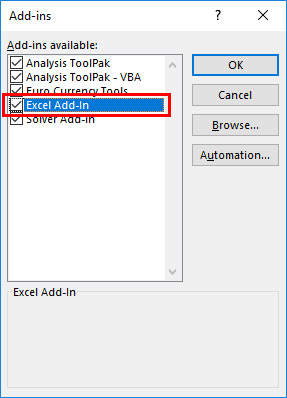
- The “Add-ins” dialog box appears. Select the required checkboxes and click “OK.” We have selected all four add-ins.

- The “Data Analysis” and “Solver” options appear under the “Data tab” of the Excel ribbon.

Types of Add-ins in Excel
The types of add-ins are listed as follows:
- Inbuilt add-ins: These are built into the system. One can unhide them by performing the steps listed under the preceding heading (how to install add-ins in Excel?).
- Downloadable add-ins: These can be downloaded from the Microsoft website (www.office.com).
- Custom add-ins: These are designed to support the basic functionality of Excel. They may be free or chargeable. ChartExpo is an example of a custom add-in, offering advanced charting tools to enhance Excel's data visualization capabilities.
The Data Analysis Add-in
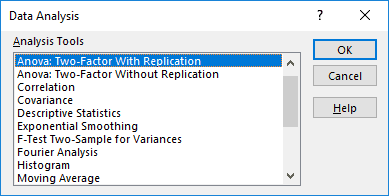
The "Data Analysis Tools" pack analyzes statistics, finance, and engineering data.

The various tools available under the "Data Analysis" add-in are shown in the following image.

Create Custom Functions and Install them as an Excel Add-in
Generally, an add-in is created with the help of VBA macros. Let us learn to create an add-in (in all Excel files) for a custom function. For this, first, we make a custom function.
Let us consider some examples.
Example #1–Extract Comments from the Cells of Excel
We want to extract comments from specific cells of Excel. Then, create an add-in for the same.
The steps for creating an add-in and extracting comments from cells are listed as follows:
- Step 1: Open a new workbook.
- Step 2: Press the shortcut “ALT+F11” to access the “Visual Basic Editor.” The following image shows the main screen of Microsoft Visual Basic for Applications.

- Step 3: Click “Module” under the “Insert” tab, shown in the following image.

- Step 4: Enter the following code in the “module” window.
Function TakeOutComment(CommentCell As Range) As String
TakeOutComment = CommentCell.Comment.Text
End Function

- Step 5: Once the code is entered, save the file with the type “Excel add-in.”

- Step 6: Open the file containing comments.
- Step 7: Select " Options " in the "File" tab and select "Options." Choose "Add-ins." In the box to the right of "Manage," select "Excel Add-ins." Click "Go."
Click the "Browse" option in the "Add-ins" dialog box.

- Step 8: Select the add-in file that had been saved. Click “Ok.”
We saved the file with the name "Excel Add-in."

- Step 9: The workbook's name (Excel Add-in) that we had saved appears as an add-in, as shown in the following image.
This add-in can be applied as an Excel formula to extract comments.

- Step 10: Go to the sheet containing comments. The names of three cities appear with comments, as shown in the following image.

- Step 11: In cell B1, enter the symbol "equal to" followed by the function's name. Type "TakeOutComment," as shown in the following image.

- Step 12: Select cell A1 as the reference. It extracts the comment from the mentioned cell.
Since there are no comments in cells A2 and A3, the formula returns “#VALUE!.”

Example #2–Hide Worksheets in Excel
We want to hide Excel worksheets except for the active sheet. Create an add-in and icon on the Excel toolbar for the same.
The steps to hide worksheets (except for the currently active sheet) and, after that, create an add-in and icon are listed as follows:
- Step 1: Open a new workbook.
- Step 2: In the “Visual Basic” window, insert a “Module” from the Insert tab. The same is shown in the following image.

- Step 3: Copy and paste the following code into the module.
Sub Hide_All_Worksheets_()
Dim As Worksheet
For Each Ws In ActiveWorkbook.Worksheets
If Ws.Name <> ActiveSheet.Name Then
Ws.Visible = xlSheetVeryHidden
End If
Next Ws
End Sub

- Step 4: Save this workbook with the type “Excel add-in.”
- Step 5: Add this add-in to the new workbook. For this, click “Options” under the “File” tab. Select “Add-ins.” In the box to the right of “Manage,” select “Excel add-in” Click “Go.”
In the “Add-ins” window, choose “Browse.”

- Step 6: Select the saved add-in file. Click “Ok.”
We have saved the file with the name “Hide All Worksheets.”

- Step 7: The new add-in “Hide All Worksheets” appears in the “Add-ins” window.

- Step 8: Right-click the Excel ribbon and select “Customize the Ribbon.”

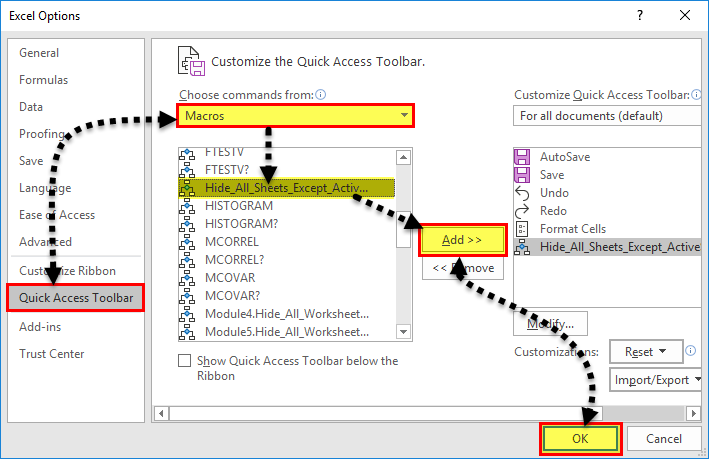
- Step 9: The “Excel Options” window appears. Click “Quick Access Toolbar.” Under the drop-down of “Choose commands from,” select “macros.”
In the box following this drop-down, choose the name of the macro. Then, click “Add” followed by “OK.” The tasks of this step are shown with the help of black arrows in the following image.

- Step 10: A small icon appears on the toolbar. Clicking this icon hides all worksheets except for the currently active sheet.

Example #3–Unhide the Hidden Sheets of Excel
If we want to unhide the sheets hidden in the preceding example (example #2). Create an add-in and toolbar icon for the same.
The steps to unhide the sheets and, after that, create an add-in and toolbar icon are listed as follows:
- Step 1: Copy and paste the following code to the “Module” inserted in Microsoft Visual Basic for Applications.
Sub UnHide_All_HiddenSheets_()
Dim Ws As Worksheet
For Each Ws In ActiveWorkbook.Worksheets
Ws.Visible = xlSheetVisible
Next Ws
End Sub

- Step 2: Save the file as “Excel add-in.” Add this add-in to the sheet.
Right-click the Excel ribbon and choose the option "Customize the ribbon." Then, in the "Quick Access Toolbar," select "Macros" under the drop-down of "Choose commands from."
Choose the macro's name, click "Add" and "OK." The tasks of this step are shown with the help of black arrows in the following image.

- Step 3: Another icon appears on the toolbar. Clicking this icon unhides the hidden worksheets.

The Cautions While Creating Add-ins
The points to be observed while working with add-ins are listed as follows:
- First, remember to save the file in Excel's "Add-in" extension of Excel.
- Be careful while selecting the add-ins to be inserted by browsing in the "Add-ins" window.
Note: It is possible to uninstall the unnecessary add-ins at any time.

